
Fall 2017 Version
JavaScript for Mohawk Students is intended to be a complete course in JavaScript programming for web application design. In this book, you will learn the basics of the JavaScript language and how to embed JavaScript programs into a web page; you will learn how to create client-side web apps; you will learn how to effectively use the extensions provided in the widely-used jQuery package, including its AJAX capabilities; you will learn how to use the new HTML5 canvas to create dynamic, graphical web content; you will learn how to access the new web storage capabilities of HTML5; and you will learn how to implement object-oriented design in JavaScript.
JavaScript for Mohawk Students is aimed at Students in the Computer Science and Information Technology programs at Mohawk College, though it could also be used effectively by students in other contexts or even by experienced programmers who are new to JavaScript.
When Mohawk students first encounter JavaScript, they have completed a programming course in Java and a first course in web design, in which they were asked to write HTML and CSS by hand (i.e. not using a WYSIWYG editor like DreamWeaver). These students already have a good understanding of variables, data types, if statements, loops, methods, HTML elements (tags and attributes), and CSS rules (properties and values). They have designed simple web pages and written computer programs that are split up into multiple methods (possibly also multiple classes) to process user input and produce new output.
If you fit the profile above, this text will leverage your prior knowledge of programming to skim over stuff you already know and focus on the differences and unique capabilities of JavaScript, jQuery, and HTML5. It will also leverage your existing web design skills to get you creating client-side web applications in JavaScript more quickly.
JavaScript is a fully-functional programming language that was designed to be embedded in an HTML page to create Dynamic HTML (DHTML). It was first shipped with the now-defunct Netscape browser in 1995. DHTML pages make use of JavaScript statements and functions (similar to Java methods) to change their appearance and contents both as they are loading and after they are loaded. (Static HTML pages, on the other hand, always look the same and do not change once they are loaded. Static pages used to be the only thing on the web, but they are now all but extinct.)
JavaScript was standardized as ECMAScript a couple of years after its initial release. The name "JavaScript" is a trademark of the Oracle corporation, but other implementations of the ECMAScript also exist (notably Microsoft’s JScript used in Internet Explorer and Adobe’s ActionScript used in Flash).
Almost all web applications make use of JavaScript for drop down menus, pop-up windows, slide shows, image magnifiers and other dynamic elements that can be implemented on the client side of the client-server architecture. Many web sites also make use of JavaScript with AJAX to load new content from the server and refresh parts of the page after load time. This is how Google makes suggestions as you type into the search bar, and how Facebook loads new content when you get to the bottom of your activity feed.
By at least one measure, JavaScript might be the most frequently used programming language: If you counted up all the lines of JavaScript in the browser caches of all the computers in the world, the total would probably be higher than the number of lines of source code in any other language.
There are two widely-held misconceptions about JavaScript. The first is that Java and JavaScript are the same language, or two versions of the same language. In fact, JavaScript is a very different programming language from Java. The similarity in names is the result of a marketing decision made by Netscape in the 1990’s. It’s true that the two languages can look similar at first glance. Like Java, JavaScript derives much of its basic syntax from the C programming language. But don’t be fooled by surface appearances. JavaScript’s variables, arrays, objects, and functions are implemented very differently from their counterparts in Java.
The second misconception is that JavaScript is somehow a less powerful, simpler, or more "lightweight" language than Java. In this case, there are several kernels of truth. It is true that JavaScript is designed to run in a restricted environment (e.g. a web page, a PDF document, the Windows desktop, etc.). It is also true that historically, JavaScript has been used mostly for very simple tasks (e.g. image rollovers and drop-down menus). And it is also true that JavaScript runs more slowly than Java (it’s interpreted rather than compiled), making it less suited to high performance applications. Finally, it is also true that JavaScript programmers do not have easy access to the same kind of standard plugin libraries that Java programmers enjoy.
But JavaScript is not "lightweight" or "simpler" in the sense of being easier to learn. Writing effective code in JavaScript can be just as difficult as any other language, and a deep understanding of how the language works is as important to being an effective JavaScript programmer as it is for a programmer in any other language.
JavaScript is also not "less powerful" in the theoretical sense than any other language. JavaScript is a fully developed, Turing complete, programming language. This means that there is no computational problem that can be solved in Java that could not also be solved in JavaScript.
With the widespread adoption of HTML5, JavaScript is poised to become the language of choice for web-based, hybrid, and possibly even standalone mobile apps, and it will soon replace Adobe’s Flash as the primary way to produce graphics-intensive web content like games, interactive diagrams and fancy menu systems. With the development of Node.js, JavaScript can now also be used to write code on the server side of a web app.
And JavaScript is not just for web apps any more. JavaScript interpreters are also embedded into the Microsoft Windows Desktop, Adobe Acrobat, Open Office, and a number of other environments to allow programmers to add apps and other dynamic functionality to these products.
It may not be long before a solid working knowledge of JavaScript is a requirement for many programming jobs.
JavaScript for Mohawk Students was designed using JavaScript, jQuery and CSS3 Media Queries to make it look good and be usable on a tablet, in a narrow desktop browser, and on the printed page. This is to make it easier for you to try things out on your computer as you read. The book also makes use of the HTML5 App Cache, which means after you load it for the first time the main text will always be available, even if your device has no Internet connection. Bookmark it once, download the example pack once, and you will always have everything you need.
Since it is a web app written in HTML5, CSS3 and JavaScript, the book can also serve as a testbed to try out JavaScript statements as you read along.
You will see lots of links and highlighted terms in the book. In most cases these are links to Wikipedia entries, w3Schools pages or online examples . When you print the book, the links appear in boldface. If the link points to anything other than Wikipedia, w3Schools or an online example, the URL will appear beside it.
W3Schools is a standard reference site for JavaScript, HTML, CSS, and other web technologies. It also has a "Try it Yourself Editor" that lets you tweak example code to see the results immediately. You should get to know this site as a good quick reference.
Wikipedia is a crowdsourced encyclopedia. For computer-related topics, the entries are usually of acceptable quality, thanks to a very large number of working computer scientists and computer programmers who police the content and keep it up to date and accurate. You should use the Wikipedia links to brush up on the meanings of terms you may have forgotten and to dig deeper into topics that interest you.
But as good as these resources are, they have some limitations. The text in w3Schools is brief and does not always work well for students without much prior programming experience, and some of the topics in Wikipedia can be difficult for a novice to read. Beginner students need detailed explanations of big ideas, lots of signposts along the way, worked examples and exercises. So we will focus on that stuff here. You are encouraged to move back and forth between this text, w3schools, Wikipedia and other sources to help build your understanding.
All sources of information (including the one you're reading now) should be treated with caution. I think w3Schools is a great resource to get quick details on HTML, CSS and JavaScript, but it is not without its critics (see the w3fools site). It has gaps and sometimes it's not as up-to-date as it should be. I also think Wikipedia generally has high quality entries for computer-related topics, but it is crowdsourced so on any given day the information might be inaccurate or out of date as well.
You should always be aware of the drawbacks of any on line source and develop strategies for cross-checking information from multiple sources. If you think you have found an error in this text, please let me know so I can investigate.
Because JavaScript and Java are both based on C syntax, and because you have some experience in Java, you should have no problem with many of the nuts and bolts of the language. Statements, comments, operators, comparisons, selection statements (^if^ and ^switch^), repetition statements (^for^, ^while^, ^do..while^) and even catching and throwing exceptions all work pretty much exactly how you would expect them to. JavaScript string objects and the special Math object also contain most of the same methods as their Java counterparts (e.g. ^charAt^, ^Math.random^, etc.)
This is great news. You already know most of the syntax of JavaScript and you haven't even done anything yet! But before you can leverage all that existing knowledge and start writing JavaScript programs, you need to understand two core features of JavaScript that make it very different from Java: its support for imperative programming and its dynamically-typed and weakly-typed approach to variables, values and data types.
Purely imperative programs consist of a list of statements in the order they are to be executed. These statements do not need to be part of a class, object, method, function or any other structure.
In human languages, imperative sentences are commands: "Do this. Now do that." Imperative programs read just like that to the computer. There are no pleasantries, you just get straight to the instructions. This is quite different from Java, where you have to define both a class and a main method before you can get to the commands.
The easiest way to execute JavaScript statements is using the JavaScript console of your favorite browser (a.k.a. Google Chrome). In Chrome, hit F12 to open the developer tools, then choose "Console" from the tabs that appear at the bottom of the page.
The console will appear as a new panel beneath the web page, like this.
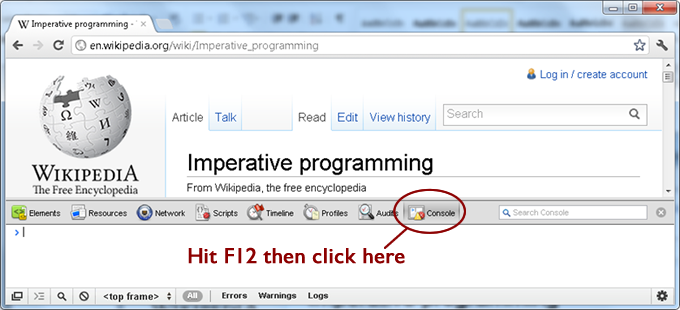
(What’s that you say? Chrome isn’t your favorite browser? Well you have two options. You can either make Chrome your new favorite, or you can search through the menus on any another browser for "Developer Tools", "JavaScript Console" or something similar.)
window.alert("Hello, World!");
…and hit enter. See the popup message?
What you have just done in the DIY box above is execute a JavaScript function named ^alert^ that is part of the built-in ^window^ object. JavaScript functions are a lot like Java methods or C functions – you call them by typing their name followed by a list of arguments inside round brackets. If a function belongs to an object, you type the name of the object first followed by the . (dot) operator.
No matter what browser you are using, you will always have access to a ^window^ object containing variables and functions pertaining to the currently active panel of the browser. And because you are always "inside" the ^window^ object when executing JavaScript, you don’t actually need to type the "^window.^" part. So this would have worked, too:
alert("Hello, World!");
"\"Murder,\", she wrote", you can use single quotes like this: '"Murder,", she wrote'). prompt('What is your name? ');
confirm("You're programming in JavaScript!");
Note the return values of each function that appear in the console window when you try the statements in the above DIY box. Just like Java and other languages, you can use the return value of one function as an argument to another.
Before we move on, a few more useful tips:
console.clear() function)alert(prompt('What do you want to say? '));
if (confirm('OK?')) alert("You're OK"); else alert("You're not OK?");
The ^prompt^, ^alert^ and ^confirm^ functions are pretty straightforward and are discussed under the heading JS PopupAlert on w3Schools.
The Chrome console is a great tool for testing out JavaScript statements and expressions to get the syntax right before incorporating them into a web page. It can also help you remember method names by popping up suggestions as you type...
… and it can evaluate JavaScript expressions for you.
5 + 3 * 2

5 <= 3

Math.round(Math.PI*2)

Math.round(Math.PI*2) < Math.PI*Math.PI
<script> ElementOf course the real point of JavaScript is to embed a program into a web page. You can put JavaScript statements anywhere you want in an HTML document, as long as they are inside a ^<script>^ element, as in the example below.
<script>
                    alert("Hello, world!");
                    </script>
You can put any number of ^<script>^ elements anywhere inside the ^<body>^ or ^<head>^ elements of an HTML document. The browser will read the page from top to bottom as it loads it. When it gets to a ^<script>^ element, it will execute the commands inside before moving on. So if the ^<script>^ element appears inside the ^<head>^, the page will be blank until the script has finished executing. If it appears in the middle of the ^<body>^, the first part of the page will be displayed, then the ^<script>^ element will run, then the rest of the page will be displayed.
You can write HTML, CSS, and JavaScript in a text editor and test it in a browser, but there are much more programmer-friendly environments out there for code creation. I recommend that you at least use a programming editor like NotePad++. This program will use color to highlight keywords, literals, and other elements, and will also do some simple bracket matching for you.
Better still is to use a fully-developed Integrated Development Environment (IDE) like NetBeans or Aptana Studio (which is based on Eclipse). For web programming, I like NetBeans the best, especially now it has support for HTML5 projects and connects to Chrome using the NetBeans Connector Plugin. Just download the latest copy of NetBeans, then start an HTML5 Project, right click it in the project window and create an HTML document. You’ll get a starting template, errors and warnings, as well as shortcuts and suggestions. You can also create CSS and JavaScript files this way, and you can "run" the files in Chrome to test them once you have installed the NetBeans plugin from the Chrome Web Store.
Once we get past this opening chapter, we won't use alert boxes very much to talk to the user. They're rather inelegant and obtrusive. But you might still want to have a way to create debugging output to let you know what is going on inside your JavaScript programs. For this, you can use the ^console.log^ function. It's a bit like ^System.out.println()^ in Java. It sends output to the browser's console where nobody but us developers will see it.
Another important feature of JavaScript that sets it apart from Java is that its variables are dynamically-typed. Another way to say this is that values have fixed data types but variables do not. JavaScript supports a number of data types including ^Number^, ^String^, ^Boolean^, ^Array^ and ^Object^ (you can look these up in w3schools under JS Data Types) but you do not have to declare a variable’s type in order to use it and you can change the type of a variable as the program runs.
Unlike in Java where you have to declare a variable by specifying its type, variable declaration in JavaScript is done with the generic keyword ^var^.
var x = 100;

alert(x);


x = "I'm a string now";

alert(x);


x = 45.3;

alert(x);


x = "$"+x;

alert(x);
(Here's a tip: To reset the console and make it forget all the variables you have defined in this session, just hit the refresh button on your browser.)
The examples in the DIY box above show that not only can ^x^ change its type from a number to a string and back again, the ^alert^ function can also take an argument of any type.
Other than the fact that variables are dynamically-typed, they work in pretty much the way you are used to from Java.
for(var i = 1; i <= 10; i++)
                    console.log(i);
Here’s another one to try.
var n = prompt("Enter a number");

if (n < 1000)
                    alert("that was a small number");
                    else
                    alert("that was a big number");
Note that in this case the variable n contains a string, but JavaScript still allows the comparison to happen. This is because JavaScript practices not only dyamic but also weak typing. More on this in the next section.
Actually, you can often use variables without declaring them at all, but this is considered very bad programming practice, for reasons we will discuss later. `Always declare your variables!`
In Boolean expressions (i.e. the expressions that evaluate to ^true^ or ^false^ to control if statements and loops) JavaScript uses aggressive implicit typecasting (also known as weak typing) to compare any two values regardless of whether or not their types match. Typecasting is the act of converting one data type to another. Implicit typecasting is when the compiler or interpreter does the conversion automatically for you.
var x = "hi";

x == 45.3

x >= 45.3

x == "hi"
The first two comparisons above are legal but ^false^. The last one is ^true^.
If a String contains a representation of a number, it can be compared to integers and floats…
var y = "50";

x = 50;

y == x
This comparison is ^true^, even though ^y^ is a string and ^x^ is a number
Because of JavaScript's weak approach to types, there is a special Boolean operator ^===^ that returns true if two values are equal and also of the same type - this is known as being "exactly equal" or "identical". Similarly, ^!==^ is a "not exactly equal to" operator that respects the types of the operands. See JS Comparison Operators on w3schools for more info.
y === x

y === "50"

y !== x

y !== "50"
Explain to yourself what is happening in each case, and why each statement is either ^true^ or ^false^.
Because of the confusion that implicit type casting can cause, it is often considered best practice to use ^===^ and ^!==^ whenever possible and try to avoid using ^==^ and ^!=^.
Sometimes you really want to treat a String value as a Number. For example, the prompt function always returns a String, which works fine in most cases, but suppose we are asking the user to enter a number and then we want to add 1 to it. The code in the DIY box below won’t do it.
var y=prompt("Enter a number");

y = y + 1;

alert(y);
The example in the DIY box above doesn’t do what we want because ^y^ is a string. So JavaScript treats the ^+^ operator as concatenation (much like Java). In this case, we need to use explicit typecasting to force the type we want. JavaScript has built in global ^parseInt^ and ^parseFloat^ functions for this very purpose.
(Unlike ^alert^, ^prompt^ and ^confirm^ which belong to the ^window^ object, ^parseInt^ and ^parseFloat^ are global functions. They do not belong to any object in the system. But this doesn't usually make a difference in practice.)
var y=prompt("Enter a number");

y = parseInt(y)+1;

alert(y);
But what if ^parseInt^ or ^parseFloat^ fail (i.e. the user typed something that can’t be interpreted as a number)? In that case, they return the special value ^NaN^ (Not a Number) which can be detected with the global Boolean function ^isNaN^. So to be fully robust, you could do the following:
var n;

do {
                    n = prompt("Enter a number");
                    } while (isNaN(n));

n = parseFloat(n) + 1;

alert(n);
JavaScript always tries to do the best it can to avoid crashing. So ^parseInt("50.5")^ will work and return ^50^. So will ^parseInt("50x6")^ (the parser just stops at the x and returns what it has so far). This can be either a blessing or a curse depending on what the you are trying to do.
Like most languages, JavaScript contains support for arrays. In many cases the code for processing arrays will look very familiar. Things are only slightly different in JavaScript because of the consequences of the language being dynamically-typed.
                    var a = [3, 4, 5];

for(var i = 0; i < a.length; i++)

                        a[i] = a[i] * 2;
Take a minute to think about what this code does, then type or paste it into a browser console window to run it, and then type ^a^ and press enter to examine the contents of the array. Did you get it right?
The first consequence of JavaScript’s dynamic typing is that you don’t have to declare a type for an array. The following pieces of code show two different ways of creating a generic empty array.
                    var a = [];

var a = new Array();
You can also create an array with some initial contents, like this:
var initializedArray = [43, "hello", -2.5, true];
The expression in square brackets above is called an array literal. In JavaScript, you can use array literals anywhere you could use an array.
Notice that this array contains values of three different types (Number, String, and Boolean). This brings us to the second consequence of dynamic typing: you can mix values of different types in a single array. In fact, you can even have arrays stored within other arrays.
var a = [6, [5, 3, -2], "JavaScript"];
How many items does the array ^a^ have in it? Type ^a.length^ to find out.
You never have to declare the size of an array in advance because you can arbitrarily extend its length after you create it.
                    var a = [];

a[0] = -23;

a[1] = 45;
Now type ^a^ and hit enter to see the contents of the array. This is an example of extending the length of an initially empty array. Type a.length to see the new length.
It is also possible to create an array with "holes" in it.
a[9] = 0;
You just created an array with 7 "holes in" it from indices 2 to 8. How long is the array now? Type ^a.length^ to find out, then type ^a^ and hit enter to find out what the contents of the array looks like.
                    if (a[3] === undefined)
                    alert("index 3 is undefined");
document Object and the DOMAfter the previous chapter, you should be able to write JavaScript programs that are integrated with a web page, communicate with the user, and solve problems. Congratulations! You still have a long way to go.
Up to this point, your interactions with the user have entirely made use of pop-up dialogs. While this style of communication is sometimes used in web apps, most input to a JavaScript program usually consists of mouse and keyboard events (i.e. moving the mouse, clicking, and typing) and most JavaScript output consists of modifications to the web page (e.g. changing colors and styles, revealing and hiding menus, changing the contents of an element, loading and displaying new content, etc.). We’ll start with the output first in this chapter, then the next chapter will show you how to respond to keyboard and mouse input. By the end of these two chapters, you’ll have the tools you need to write much more professional web apps.
Every JavaScript program running in a web browser has access to a ^document^ object. This object holds the browser’s internal representation of the Document Object Model (DOM), and contains all the information the browser constructs using the HTML tags and attributes, CSS style rules, images, and other components that make up the source code of the page. Understanding the DOM is key to becoming an effective JavaScript programmer.
Like any bracketed structure, an HTML page can be viewed as a hierarchical family tree of elements containing other elements. When the browser reads an HTML source page it constructs an object for each element, links it to the elements it contains (the "children") and also links it to the element that contains it (the "parent").
                    <!DOCTYPE html>

<html>

                        <head>

                            <title>Hello World</title>

                        </head>

 <body>

                            <h1 id='message' class='heading'>Hello, World!</h1>

<img src='images/smiley.jpg' alt='smile image'>

                        </body>

                    </html>
In the example above, the document consists of a ^<!DOCTYPE>^ element and an ^<html>^ element. The ^<html>^ element contains a ^<head>^ and a ^<body>^. The ^<head>^ contains a ^<title>^ element and the ^<body>^ contains an ^<h1>^ element and an ^<img>^ element. This set of relationships can be displayed in a tree diagram like the one shown below.
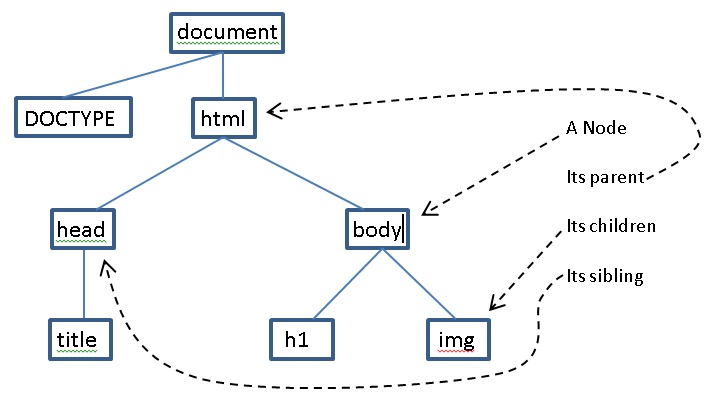
The items in the boxes are referred to as nodes. Each node is a JavaScript object that has been constructed by the browser to represent the corresponding HTML element. Each node object contains information about the attributes, CSS style and contents of the element it represents.
A node can have one parent above it, any number of children directly below it, and any number of siblings (nodes with the same parent). The root node is at the top and the leaf nodes are the ones at the bottom with no children, which makes this a curious sort of upside down "tree". When you are using JavaScript in a web page, the ^window^ property, ^document^, holds the root node of this tree. Like all properties and functions belonging to the ^window^ object, you can access ^document^ on its own or by typing ^window.document^.
There is a lot more to say about the structure of the DOM than this, but the information in this section is good enough to get you started.
The last section introduced the notion of an Object, so we better say a few words about that before we move on.
Just like in Java, a JavaScript object is a package of variables (or "fields" or "properties") and code (or "methods") stored together under a single variable name. In your experience with Java you have probably used objects before, and you may even have created your own objects.
For example, in JavaScript every String object has a field named ^length^ and a method named ^charAt^ (just like the Java ^String^ object). The code in the DIY box below creates a string and displays its length and first character. Note the use of the variable name, ^s^, with the dot operator to access the variables and methods that belong to the object referenced by ^s^.
                    var s = "JavaScript is Cool. ";

 alert(s.length);

 alert(s.charAt(0));
The second line in the code above accesses the ^length^ field associated with the object ^s^. The third line calls the ^charAt^ method with the parameter 0 to get the first character from the object ^s^. The ^charAt^ method returns a string of length 1.
One thing that is a little different about JavaScript is that you can use either dot notation or square bracket notation to access an object’s properties and methods. For example, instead of ^s.length^ and ^s.charAt^, you can write ^s["length"]^ and ^s["charAt"]^, as shown in the DIY box below.
This square bracket object notation looks and behaves exactly like a data structure called an associative array (or sometimes a "map" or a "dictionary"). Indeed, there is really no difference between an object and an associative array in JavaScript, so both styles of referencing are included for the convenience of the programmer.
                    var s = "JavaScript is Cool. ";

alert( s["length"] );

alert( s["charAt"](0) );
This square bracket style of accessing an object’s fields and methods might seem strange, but it has its uses. For example, try the following (after typing the lines above). Make sure you type something legal like "length" when prompted.
                    var fieldName = prompt("type a field name");

alert( s[fieldName] );
There are lots of ways to access and dig through the DOM tree from within a JavaScript program, but by far the easiest way to retrieve a node is by using its ^id^ attribute. To do this, use the ^getElementById^ method of the ^document^ object to reach into the DOM and grab the node you want (note the lower-case ^d^ in that method name!). Once you have it, you can access and/or change the contents of the element, its style information, or any of its attributes.
Any element you retrieve using ^document.getElementById^ will be an object of type ^Element^ (and also of type ^Node^). JavaScript Element objects contain a number of fields, each containing information associated with the corresponding HTML element. These fields can be used to make changes to the DOM long after a page has been loaded.
Here are some of the more useful ^Element^ fields...
var e = document.getElementById("message");

e;

e.innerHTML;

e.style;

e.className;
Now add an ^id^ attribute to the ^<img>^ element, either by changing the source code, or by changing the DOM through the Elements view (see a previous DIY box).
An alternative to the ^getElementById^ method is ^querySelector^. You can use ^querySelector^ with any CSS selector and it will return the first matching element (or ^null^ if no elements match).
For example, ^document.querySelector("h1")^ returns the first ^<h1>^ element in the DOM, ^document.querySelector("h1.main")^ returns the first ^<h1>^ element with a class of ^main^, and so on. And of course, ^document.querySelector("#myId")^ is equivalent to ^document.getElementById("myID")^.
                    document.querySelector("div.DIY")

document.querySelector("div.JC")
The ^querySelector^ method can sometimes be a useful tool to have in your toolbox, but to keep things simple, I will continue to just use ^getElementById^ in the examples that follow.
innerHTMLAn ^Element^'s ^innerHTML^ property contains a String representation of the content of the corresponding DOM node. The content is everything that appears between the opening and closing tags that defined that node in the original HTML file. Changing this string is probably the easiest way to rewrite part of the DOM.
The DIY example below shows you how to change the text contents of an element.
(Be careful with case here. If you type ^innerHtml^ instead of ^innerHTML^, the command may fail without even giving you an error message!)
                    ^<h1 id="heading">^A Simple Example^</h1>^

^<p>^Here is some text in a paragraph.^</p>^

^<script>^
                    alert("Press OK to see me change my own heading.");

document.getElementById("heading").innerHTML = "Done";

                    ^</script>^
See if you can rewrite this code so that instead of just rewriting the heading, it also rewrites the ^<p>^ element.
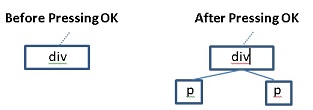
You can also place HTML tags into the ^innerHTML^ field of a node. When you do that, the browser will read the tags, create node objects for the corresponding HTML elements, and add them to the DOM, as demonstrated in the DIY box below. If the ^innerHTML^ of the element you rewrite already contained other HTML elements, the corresponding nodes will be discarded from the DOM and replaced with new ones.
^<div id='target'>^Here is some text in a div.^</div>^

^<script>^
                    alert("Press OK to see me change the contents of my div.");

document.getElementById("target").innerHTML =

"^<p>^First paragraph^</p>^^<p>^Second paragraph^</p>^";

                    ^</script>^
Rewrite the code so that it asks the user for some HTML and then inserts whatever the user types into the ^<div>^.
Here is a diagram of the relevant part of the DOM before and after executing the script in the DIY example above.
Unlike Java, JavaScript allows you to create a new field in any object at any time simply by assigning something to a new field name. This is very convenient, but it also means that some errors are hard to catch. If you misspell a field or get the case wrong JavaScript will modify the object by adding a new field without warning you about what has happened.
For example if you type ^node.innerHtml = "new content"^, the ^innerHTML^ field of the ^node^ object will not change because you got the case wrong on its name. But you will not get any error or warning messages either since JavaScript just adds a new ^innerHtml^ field to the ^node^ object.
<script> element after the <div> to put a JavaScript program. This program should ask the user how many paragraph elements they want, then ask them to type a sentence to use as the content of those paragraphs. Then change the contents of the <div> element according to what the user entered. Right click the page and choose "inspect element" to make sure that the paragraphs got created correctly.styleChanging an element's CSS information can be done most easily by accessing the ^style^ field of the corresponding DOM node. This ^style^ object contains all the in-line CSS information for the Node, where each field of the object corresponds to a CSS property.
var e = document.getElementById("heading");

e.style.color = "red";
Now try changing other CSS styles in the same way. Add a border, change the font, position the header below the paragraph, etc.
In addition to assigning or changing style information, you can also read style information from the fields of the ^style^ object, but you cannot read any CSS properties that were defined as part of a style sheet in this way.
var e = document.getElementById("target");

e.style.color;

e.style.border;
Why does one of the above lines give you a value but not the other? View the original page source and see if you can figure it out.
The only wrinkle in accessing the style object above is that you can get into problems with the dot notation for hyphenated style properties like ^background-color^. The problem is that the JavaScript expression ^e.style.background-color^ looks like we are subtracting the variable color from the field ^e.style.background^. The solution implemented in most browsers is to convert hyphenated-property-names to camelCasePropertyNames (e.g. ^border-radius-top-left^ becomes ^borderRadiusTopLeft^).
var e = document.getElementById("heading");

e.style.backgroundColor = "red";
Now change some other hyphenated properties, like ^font-size^, ^border-radius^, etc.
Don't forget that you can access an objects' fields using the dot notation or associative array notation (see the section on JavaScript objects above). Many JavaScript programmers choose to use this notation for style properties. So in the most recent DIY box above, instead of ^e.style.backgroundColor^ many JavaScript programmers would prefer ^e.style["backgroundColor"]^. It's up to you which method you use to access the ^style^ object's fields (or any object's fields for that matter) but you need to know about the two alternatives in order to read other people's code effectively.
class NameSometimes you may want to change a large number of property/value pairs at once. In this case, a good option might be to define styles for two different classes, and then change the ^className^ field of the element. This will automatically update the style of the element to match its new class, effectively changing many styles at once.
document.getElementById("maindiv").className="classtwo"
You should see a big change. Take a look at the source code for this file to see how this change happened. Can you use a single command to change it back to the way it was originally?
(Advanced Programming Note: If you need an object to have multiple classes associated with it, you can use the ^classList^ api for that object. You won't find this on w3schools, so here's a link to the Mozilla Developer Network ClassList page.)
You can also access, change or add any other attributes of an element by accessing the fields for those attributes. For example, if you want to change an image, you can modify its ^src^ attribute by accessing the ^src^ field of the corresponding node. Or if you want to change a link, you can modify the ^href^ attribute of the corresponding node.
node = document.getElementById("testDIY");
Now add a ^title^ attribute:
node.title="Read Me!";
Now hover the mouse over this DIY box to see the effect of this statement. Then right-click and choose "Inspect Element" to see the attribute you added to the DOM.


If you are comfortable with indexed structures such as arrays, you can use several other powerful ^document^ methods, including ^querySelectorAll^. This method behaves just like ^getElementById^, except that instead of passing it an ^id^ attribute value, you pass it a CSS Selector and it returns a NodeList object (an array-like structure) containing every element that matched the selector.
document.querySelectorAll("p");
You should get a NodeList object returned that contains all the ^<p>^ elements in the document. To get a particular one, use square brackets like this:
document.querySelectorAll("p")[2];
Or like this:
                    var paragraphs = document.querySelectorAll("p");

paragraphs[2];
Now try to get all the elements with the class name "body":
document.querySelectorAll("p.body");
These methods can be handy if you want to make a change to a bunch of elements at once. Once you have them in a NodeList you can use a loop to change them all.
                    var a = document.querySelectorAll("p");

for (var i=0; i<a.length; i++)

                        a[i].innerHTML="JavaScript Rules!";
Did the code do what you expected? Can you figure out how to select all the Do It Yourself boxes on this page and change their background color to red?
In the previous chapter you learned how to manipulate the DOM to produce different kinds of output from a JavaScript program. But you are still very limited in the kinds of input you can get from the user. This chapter will begin to change that.
Up to this point, you have only been using JavaScript on your web pages in an imperative programming style, running scripts within a ^<script>^ element as the page is loading. This is pretty limiting. Usually you want to make changes or interact with the user after the document is loaded, not while it’s loading. To do this, you need to declare functions while the page loads and then execute them later in response to specific events.
JavaScript functions are a lot like the methods, procedures, and functions found in most other languages. Here's an example of a JavaScript function declaration.
function hello() {
                    alert("Hello, world!");
                    }
The above function has no parameters and no return value. Note that the syntax is almost identical to Java method declaration except that you use the keyword ^function^, and you don’t have to specify a return type. You also don’t need to specify an access level (public, private, etc.) or whether the function is static or not – none of these things apply in JavaScript.
Functions can be defined anywhere on the page, as long as they are inside a ^<script>^ element, but it’s good practice to define your functions in a ^<script>^ element at the top of the document, inside the ^<head>^ element. It’s even better practice to define your functions (and the rest of your code) in a separate file or multiple separate files with a ^.js^ extension. Then you can load these files using the ^src^ attribute of an empty ^<script>^ element, like this:
^<script src="js/hello.js">^^</script>^
Note that a ^<script>^ element can be used in two ways - either you can put JavaScript code between the opening and closing tags, or you can leave the element empty and use a ^src^ attribute to load JavaScript code from an external file. But you cannot do both in the same ^<script>^ element. If you want to load some code from a file and put some directly on the page you will need two ^<script>^ elements.
No matter where you define a function, it won’t execute unless you call it. Most JavaScript function calls are triggered in response to browser events. An event is an important milestone in the life of a page. Events are triggered whenever an element has finished loading, the user has resized the browser, an element has been clicked, the mouse has entered or left the page, a key has been pressed and so on.
Any HTML element can be the source of an event. By default most events are ignored, but for any particular event that might occur to any particular element, you can give the browser a block of JavaScript statements to execute when the event occurs. These statements can include a call to the function you defined.
Here’s an example:
^<p onclick="alert('You clicked me!');">^ Click Me ^</p>^
The HTML code above creates a paragraph element with the text "Click Me". The ^onclick^ attribute contains a single JavaScript statement that should be executed when a click event happens (i.e. when the user clicks on the paragraph).
Note that the JavaScript statement has to be enclosed in quotation marks, like any attribute value, and that because of this, the alert command has to use single quotes around the text in order to be syntactically correct. Alternatively, since HTML and JavaScript both treat double and single quotes interchangeably, you could have written this:
^<p onclick='alert("You clicked me!");'>^ Click Me ^</p>^
You can put as many JavaScript statements as you want into the ^onclick^ attribute, as long as they’re separated with semicolons. But if you need a lot of code there, you should probably define a function and put a call to it into the ^onclick^ attribute instead. The example below executes the ^hello^ function defined in the previous section when the heading is clicked.
<h1 onclick="hello();">Click Me</h1>
Other JavaScript mouse events are listed below.
Clicking on text is all very well, but we should really be clicking on buttons. Clicking on buttons can be more intuitive to users, and the default style of buttons (color, text, size) changes on on mouse-overs or mouse-clicks to make them appear more active.
You can define a button like this, where the ^value^ attribute holds the button text:
^<input type="button" value="Press me">^
To make it respond to clicks, just add an ^onclick^ attribute, like this:
^<input type="button" value="Press me" onclick="hello();">^
Another option to give the user a better ^onclick^ experience is to use a ^<span>^ element with the CSS ^cursor^ property defined (and also possibly some ^:hover^ styles). This will style the click-able area like a link and make it more obvious that it can be clicked.
^<h1 id="heading">^

                    You can
                    ^<span class="clickable" onclick="changeSize()">^
                        click here
                        ^</span>^

                        if you want.
                    ^</h1>^
The ^clickable^ class has CSS style rules that change the cursor and add other hover effects.
Just like Java methods, functions can have parameters and return values. But in JavaScript, there is no need to declare any types for anything. Here’s an example:
function foo(x, y, z) {
                    return x+y+z;
                    }
The function above takes three parameters and returns the result of "adding" them together. What gets returned depends on the type of what was passed in.
If a function finishes without encoutering a return statement, it will return the special JavaScript value ^undefined^ by default.
foo(1,2,3)

foo(1,"2",3)

foo(1,2,"3")
Can you explain why the function returns different results for each call?
Variable scope refers to the parts of a program that can see a given variable. If a variable can only be accessed within a give code block, the variable is local to that code block. If it can be accessed anywhere in the program it is global.
Variables declared inside functions or listed as parameters are local to the function. These variables are created when the function is called and destroyed when it finishes. Variables declared outside of functions are always global, which means they are accessible to all functions on the page.
If a function contains a variable name that is the same as a global variable name, references to that name within the function will always be to the local variable.
                    var current = 0;

function add(inc) {

                        var newVal = current + inc;

current = newVal;

alert(current);

                    }
Load |functions5.html| from the example pack and press a button. Now open a console window (F12) and type the following expressions followed by enter:
current
Explain the result returned from each expression.
newVal
inc
There is a big gotcha with variable declaration which we have been able to ignore until now, but it's time to point it out. The issue concerns the fact that you don’t actually have to declare variables at all in JavaScript. Variables will automatically be declared for you the first time you assign something to them. But it is very bad practice to not declare a variable because if you don’t, the variable will be created with global scope.
current

newVal

inc
Explain why the results are different from the results in the last DIY box.
Automatic variable declaration can cause confusion, not to mention hard-to-find bugs (see the Java connection box below). But some of the problems go away if you make it standard practice to `always declare all variables using the ^var^ keyword`.
int myvar = 0; // Java variable declaration.

myvsr = 10;   // Error stops compilation.


var myvar = 0;	// JavaScript variable declaration

myvsr = 10;	// Creates new global variable. No error.
You see drop-down menus all over the web, on sites designed for both desktop and mobile viewing. Modern desktop sites often contain "mega-menus" that are rich with structured information and links, as shown below:
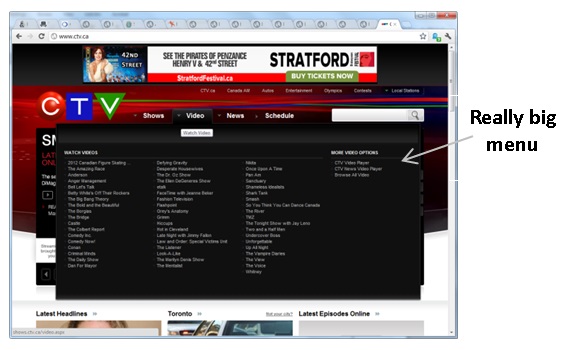
These mega-menus sometimes pop up when you click a button or tab, and sometimes when you mouse over a tab. To see how this is done, go to a site with a menu like this (e.g. The Boston Globe or CTV), right click the menu once it’s popped up and "inspect element". You'll find it's just a ^<div>^ element (or similar) positioned cleverly, and then shown and hidden by a JavaScript function using either the CSS ^visibility^ or ^display^ property. Sometimes the JavaScript function also changes the style of the button to match the drop down menu style and indicate which menu is being displayed.
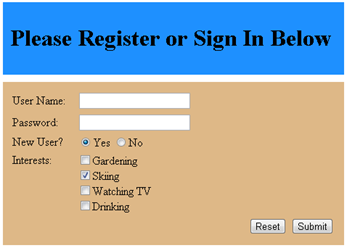
A web app, whatever job it is designed to do, needs to be able to have a dialog with the user. In previous chapters you learned several simple ways of interacting with the user on the client side using JavaScript popups, HTML buttons, and events like ^onclick^. HTML forms provide a richer set of tools for getting user input.
You were introduced to the basic HTML form elements in your previous web design courses, but you may need a review. Try the activities below, and if you need any help brushing up on this stuff, read the w3Schools HTML Forms section. You might also want to look at the Forms section of the w3schools HTML Events page.
Just like any other HTML element, a form element can be configured to execute JavaScript statements in response to various events.
Here is a partial list of events that form elements can respond to.
You can process a form element event in much the same way as you process any other event, by including some JavaScript code in the attribute for that event, as shown below.
^<input type="radio" onclick="`alert('clicked!');`">^
The JavaScript code in bold above will be executed when the radio button is clicked.
Notice that the string passed to the alert function is written with single quotes instead of double quotes. This is so it can be placed within the double quotes required by the ^onclick^ attribute without causing a syntax error.
One final event you may need to know about is ^onsubmit^. This event applies to ^<form>^ elements, rather individual ^<input>^ elements, and it is triggered whenever a form is submitted. A form is submitted either when the user presses a ^submit^ button (if you have one) or when they press ^enter^ inside a text input element.
If the form's purpose is to send data to a server, you can use this event to do some JavaScript processing to make sure the data they entered is ok, then return ^true^ if you want to allow the user to submit the form, or ^false^ if you want to prevent it.
For client side web apps, you usually don't want the form to be submitted anywhere, which is why you don't specify an ^action^ attribute on the ^<form>^ element, and why you don't usually have a submit button. But with no ^action^ attribute, if the form gets submitted somehow, it will trigger a page reload which will reset the page and mess up the running of your app. To prevent this, you could just not bother with the ^<form>^ tags, or you could add ^return false;^ to the ^onsubmit^ event:
<form onsubmit="return false;">
In order to properly respond to many form events, you need to be able to get the form elements from the DOM. You can do this by assigning an ^id^ attribute to each one and using ^document.getElementById^. This is the best choice if you have elected not to use ^<form>^ tags (see previous section). But the ^document^ object also contains a ^forms^ field that lets you access forms and their elements using their ^name^ attributes. This is the standard method of form access in JavaScript.
                    document.forms

document.forms["form1"]

document.forms["form1"]["name"]

document.forms["form1"][0]
Make sure you understand the results before you move on. What is the difference between the result of the first and second expressions? What is the difference between the third and fourth expressions?
document.forms["form1"]["name"].style.backgroundColor="red"
Or like this
                    var node = document.forms["form1"]["name"];
                    node.style.backgroundColor="red";
Recall that when you access an object’s fields, you can use either the dot operator or square brackets (i.e. ^object.field^ or ^object["field"]^). It is considered good practice by many JavaScript programmers to use the square bracket (associative array) notation to access named elements from the DOM. This is because sometimes the names can contain characters that would cause problems when using the dot operator.
So to access a named input element from a named form, use the following formula, where ^formName^ and ^elementName^ match the ^name^ attributes of the form and element respectively:
document.forms["formName"]["elementName"]
To access an input element that is not part of a form, just give it an id and retrieve it using ^document.getElementById^.
To create a client-side web application, you need to be able to access and process the user input that is stored in the form. For almost all input elements (text boxes, numbers, dates, etc.) you can access the ^value^ attribute to find out what content the user has entered. This attribute always contains a string representing the data the user entered.
document.forms["form1"]["password"].value
Congratulations, you are now accessing user input. You can also change form contents like this:
document.forms["form1"]["name"].value = "Type Here"
If the form element is of type ^radio^ or ^checkbox^, it’s a little more complicated because what you get back from ^document.forms["formID"]["elementName"]^ is an array of elements. You have to specify the index number of the particular element in the group. The first radio button in the group will be index 0, then 1, etc. You can access the ^checked^ field to get a Boolean value (^true^ if the button is checked, ^false^ otherwise).
document.forms["form1"]["interests"]
You should get an array of checkboxes back. Now try this to get the second checkbox.
document.forms["form1"]["interests"][1]
Finally, try this:
                    if (document.forms["form1"]["interests"][0].checked)

                        alert("I knew you liked gardening!");
What happened? Probably nothing. Why? What do you have to do to make the alert box pop up?
When you harness the power of forms, you can create client-side web apps with almost the same input capabilities as any desktop GUI app.
An example of a very simple client-side web app is shown in the |additionQuiz.html| file from the example pack. This program contains two JavaScript functions. The first function creates and presents a new question to the user and clears out any old answers or feedback, while the second checks the user’s answer and gives feedback. Each of these functions is called by a different button press.
Notice the use of the ^<span>^ elements with unique ^id^s. They allow the values for the two operands to be set in a JavaScript function without rewriting the entire paragraph element that contains them.
Notice also the use of the ^onload^ event in the ^<body>^ element. This event is triggered after the ^<body>^ is finished loading, and calls the function to set the first question.
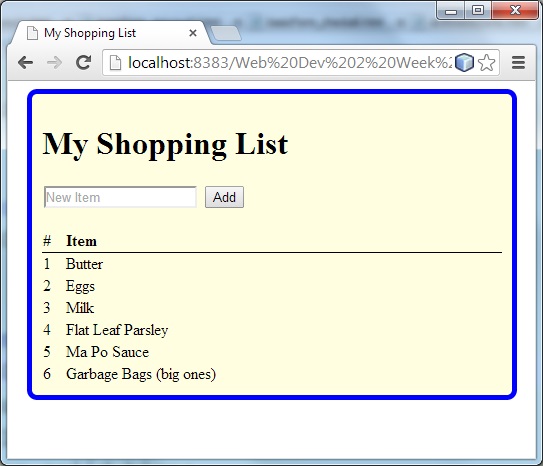 Make a simple shopping list creation app. It should give the user a text box and a button to press. When they press the button, it should add the text they entered to a ^<table>^ element somewhere on the page. It should be a numbered list with numbers added automatically. The first column of the table should contain item numbers and the second column should contain the items the user entered. Try to make it so that the user can also hit Enter to create a new list item.
HTML5 brings with it a number of new JavaScript APIs that greatly increase the capabilities of JavaScript web apps. For example it is now possible to access a user's location, store data locally and respond to drag-and-drop events. One of the most important new JavaScript APIs is the new drawing API for the HTML5 ^<canvas>^ element. This API allows JavaScript programmers to create interactive graphics and games that can execute on any browser (functionality that previously required a bulky plugin like Flash).
The goal of this chapter is to give you all the raw materials you would need to implement a simple 2D game such as Pong. The chapter focuses on the basics, not the details. For full details, see the w3schools Canvas Reference.
To access the 2D drawing API, you need a ^<canvas>^ element somewhere on your HTML page. This element should have an ^id^ attribute as well as ^height^ and ^width^ attributes to specify its size in pixels, like this:
<canvas id='myCanvas' height='500' width='250'></canvas>
Note that ^<canvas>^ is not an empty element. You do need a closing tag. There is no need to include any content between the tags, though some developers put a message there which will display on older browsers, saying something like, "Sorry, your browser does not support the HTML5 canvas."
By default a canvas just appears as a blank space on your page. But if you style it with CSS to give it a border and background color, you will be able to see it.
There are two steps to drawing on a ^<canvas>^ element. First you have to retrieve the element from the DOM:
var c=document.getElementById("testCanvas");
Once you have it, you can change its style and attributes like any other element. But if you want to draw on it, you need to retrieve a drawing "context". The simplest context available is the "2d" context:
var ctx=c.getContext("2d");
The above line retrieves a special "drawing context" object that implements the 2D drawing API for your canvas.
                    var c=document.getElementById("testCanvas");

var ctx=c.getContext("2d");

ctx.fillStyle="red";

ctx.fillRect(125,25,150,50);
The first two lines retrieve the canvas and drawing context to variables named ^c^ and ^ctx^ respectively. The third line sets a drawing color. Colors can be specified using any CSS color value. The final line places a red rectangle in the middle of the canvas. The top left corner is at an ^(x,y)^ position of (125,25), the width is 150 and the height is 50 pixels.
There are two basic kinds of drawing supported on the 2D drawing context (hereafter abbreviated ^ctx^): "stroke" draws outlines and "fill" fills them in.
You have already seen the ^ctx.fillRect()^ method, but there is also a ^ctx.strokeRect()^ method that uses the same parameters to draw the outline of a rectangle instead of filling it in. There is also a ^ctx.clearRect()^ method that clears a rectangle to the CSS background color.
When you do "fill" drawing, the canvas uses the current contents of the ^ctx.fillStyle^ field to decide how to do the drawing. The ^ctx.fillStyle^ field can hold a color string (any legal CSS color value is supported) or a special object representing a gradient or a pattern (for more information on gradients and patterns see the w3Schools Canvas Reference).When you do "stroke" drawing, the canvas uses the current contents of ^ctx.strokeStyle^, which can take the same values as ^ctx.fillStyle^. Another relevant field for stroke drawing is ^ctx.lineWidth^ which holds a number representing the thickness of the line to draw in pixels.
If you want to draw text, there are ^ctx.fillText()^ and ^ctx.strokeText()^ methods. You can set the font by assigning a string representing a CSS font to the ^ctx.font^ field.
                    var c=document.getElementById("testCanvas2");

var ctx=c.getContext("2d");

ctx.strokeStyle="#FF0000";

ctx.lineWidth=10;

ctx.strokeRect(125,25,150,50);
Now add some text to the canvas:
ctx.fillStyle="#0000FF"

ctx.font="22px Arial";

ctx.fillText("Hello, world!",135,55);
Now try the following to clear part of the drawing:
ctx.clearRect(0,0,200,50);
Drawing code should be placed in a function so that it can be called in response to an event. Then you can, for example, draw in response to a button click or when someone mouses over the canvas.
Often, though, you will want to draw on the canvas as soon as the page loads. You might think the right approach in this case is to not use a function, but simply include the drawing commands inside a script element. The problem is that your code might execute before the DOM is completely constructed. If that happens, the DOM node for the canvas might not be available at the time your code runs.
The solution is to put the drawing code in a function and then call it in response to the ^onload^ event of the ^<body>^ element, like this:
<body onload='draw()'>
The ^onload^ event is fired once, just after the browser has finished constructing the DOM. You should use this event to execute any kind of initialization code, including canvas drawing.
If you want to draw a polygon other than a rectangle, you have to first trace a path on the canvas and then either ^fill()^ or ^stroke()^ it.
Drawing a polygon has five steps:
                    var c=document.getElementById("testCanvas3");

var ctx=c.getContext("2d");

ctx.fillStyle="rgb(255,128,0)";

ctx.beginPath();

ctx.moveTo(200,20);

ctx.lineTo(260,80);

ctx.lineTo(140,80);

ctx.closePath();

ctx.fill();
The context still remembers the path even after you have used it to draw a shape. So if you want to put an outline around your triangle you can do so without retracing the path:
                    ctx.strokeStyle="rgba(0,128,255,0.5)";

ctx.lineWidth=10;

ctx.stroke();
To draw a new shape, just begin a new path:
                    ctx.beginPath();

ctx.moveTo(140,20);

ctx.lineTo(260,20);

ctx.lineTo(200,80);

ctx.closePath();

ctx.fillStyle="black";

ctx.fill();
The ^ctx^ object also contains methods for drawing circles and arcs, to be used alongside ^ctx.beginPath()^, ^ctx.fill()^, ^ctx.stroke()^ and the other path drawing methods.
You can use the ^ctx.arc()^ method to draw a circle or part of a circle. You specify the center of the circle, its radius and then the starting and ending angle for your curve. These angles are specified in radians, which is an alternative to using degrees (in the same way that inches are an alternative to centimetres). When you work with radians, π radians (that's the Greek letter Pi, where π≅3.14) is equivalent to 180 degrees. So π/2 is 90 degrees, π/4 is 45 degrees, and so on. You can use the built in JavaScript constant ^Math.PI^ for this.
At right is a quick reference for common radian values to use in arc drawing. (The picture itself is actually a ^<canvas>^ element and the diagram is drawn using JavaScript.)
                    var c=document.getElementById("testCanvas4");

var ctx=c.getContext("2d");

ctx.fillStyle="pink";

ctx.beginPath();

ctx.arc(200,50,45,0,Math.PI*2);

ctx.closePath();

ctx.fill();
If you want half a circle, you should draw from π/2 to 3π/2.
                    ctx.strokeStyle="black";

ctx.beginPath();

ctx.arc(200,50,45,Math.PI/2,3*Math.PI/2);

ctx.closePath();

ctx.stroke();
 Arcs are always drawn clockwise by default. What would you need to change in the above commands to draw the other half of the circle?
There are also commands available to draw curves as part of the path (that is, continuing from wherever your path left off). They are ^ctx.arcTo()^, ^ctx.quadraticCurveTo()^ and ^ctx.bezierCurveTo()^. There are also other advanced drawing commands are all discussed in full in the w3Schools Canvas Reference.
If your goal is to create a game or some kind of interactive display, you need to be able to react to user input on the canvas from a keyboard or a mouse. (You also need to be able to produce animations, but that will be covered in Chapter 6).
You were introduced to all the relevant mouse event attributes in Chapter 5. As a reminder, they are ^onclick^, ^ondblclick^, ^onmousedown^, ^onmouseup^, ^onmouseover^, ^onmouseleave^ and ^onmousemove^. But to take full advantage of these events for a canvas, it is not enough to know that the canvas was clicked or that the mouse is moving on top of the canvas, we also need to know where the mouse is. For this, you can use the ^event^ object.
Whenever an event happens, an ^event^ object is created that contains information about the event. That event object is passed to the code you put inside the event attribute (this is done through a wrapper function that is created to contain the code you write there). You can access this event object and pass it on to the function you wrote to respond to the event, like this:
<canvas onclick='myFunction(event);' ... ></canvas>
Now you can get information out of it. For example, ^event.target^ will be a reference to the element that was the target of the event, in this case the canvas.
Finding out where on the canvas the mouse event happened takes a little bit of math:
var x = event.pageX - c.offsetLeft
The ^pageX^ and ^pageY^ properties get you the x and y location of the exact pixel on the web page where the click happened, with ^x==0^ and ^y==0^ being the very left and top edges of the page. But you want to know where on the canvas the click happened, with ^x==0^ and ^y==0^ being the left and top edges of the canvas. To find out, you simply have to subtract the ^offsetLeft^ and ^offsetTop^ properties of the canvas (^c^), which tell you how many pixels the canvas is away from the left and top of the screen.
var y = event.pageY - c.offsetTop
                    var x = event.pageX - c.offsetLeft - 30;

var y = event.pageX - c.offsetLeft - 30;
Now change ^onclick^ to ^onmousemove^ for one of the canvases. This could be the beginning of a painting app...
There are a few other event fields that might also be useful for mouse input: ^event.ctrlKey^, ^event.altKey^ and ^event.shiftKey^ will each be true if the ^ctrl^, ^alt^ or ^shift^ keys (respectively) were held down when the mouse event happened. Otherwise they will be false.
There are two keyboard events that are guaranteed to work on all browsers. The ^onkeydown^ event will fire when a key is pressed down, and the ^onkeyup^ event will fire when the key is lifted. In theory these event attributes can be placed on most HTML elements, but keyboard events will only ever be fired for elements that have focus.
It is possible to give focus to a ^<canvas>^ element. To do this you need to give the ^<canvas>^ a ^tabindex=1^ attribute and then call the javaScript ^focus()^ function on the element to give it the focus. But this is a little awkward and if there are other focusable elements on the page, they could steak focus away.
A better solution is often to put the ^onkeydown^ and ^onkeyup^ events on the ^<body>^ element. This is the one element that always has focus.
Just like with mouse events, you should pass the ^event^ object to the function you are calling:
<body onkeydown='foo(event);'>
Then you can access the integer code for the key that was pressed as follows:
function foo(event) {
Just like with mouse events you can also use ^event.ctrlKey^, ^event.altKey^ and ^event.shiftKey^ to find out if any of these keys were held down when the event happened.
alert(event.keyCode)
}
Up until now, you have been adding event handlers to elements by placing JavaScript code into the corresponding HTML attributes, like this:
^<input type="button" onclick="myFunction()">^
This is not considered best practice by most JavaScript programmers for at least three reasons.
It is widely considered best practice to add event handlers using JavaScript statements after the document has loaded. But to be able to do that, you need to understand how JavaScript functions work in a little more depth.
The truth about JavaScript functions is that they are actually values, just like Strings, Numbers, Booleans, and Objects. Like any other value, functions can be stored in variables, passed as parameters to other functions, and returned from function calls.
The technical term for this is that JavaScript functions are first-class functions.
When you use a function declaration like this...
                    function foo (a, b, c) {
                    alert(a+b+c);
                    }
... what you are really doing is creating a variable named foo, and assigning a function value to it.
The following shows the assignment of a function literal to a variable. It is legal JavaScript code, and is equivalent to the function declaration above:
                    var foo = function(a, b, c) {
                    alert(a+b+c);
                    };
The above statement creates a variable named ^foo^, and assigns to it an anonymous function with 3 parameters. (Note that since the statement above is an assignment statement, we put a semicolon at the end of it.) The function being assigned is called an anonymous function because it is created without being given a name. The "name" used to call it comes from the assignment of the anonymous function to a variable.
Anonymous functions are also referred to as "function literals" because they are like Number, String or Array literals - they are values that are hard-coded into the program.
The main difference between the two notations is that you can only use function declaration in certain contexts, but you can use variable declaration and function literals in any context. In fact, the function declaration notation is often avoided by JavaScript programmers on the grounds that it is limited in use and adds nothing to the language. These programmers always use the variable declaration / function literal notation instead.
                    function foo () {alert("hi");} ← foo is a function

foo;

foo();
`Question:` What is the difference between the last two lines above?
                    alert(foo);

alert(foo());
`Question:` What is the difference between the above two lines?
                    foo = 5; ← foo is now a number

alert(foo);


foo = function() {alert("hi");}; ← foo is a function again

alert(foo);


foo = "hi"; ← foo is now a string

alert (foo);
`Answers:` In the console window, ^foo^ returns the value of the variable. It's a function. But ^foo()^ calls the function so you will see the popup. On the other hand, ^alert(foo)^ will display a popup whose content is the value of the variable ^foo^ (if it's a function, it will show you something to that effect). Finally, ^alert(foo())^ will first call the ^foo^ function, displaying a popup. Then it will create another popup to display the return value of ^foo^. Since there is nothing explicitly returned, it will return the special value ^undefined^.
If you want to add event handlers to an element after it is created, you can do it by retrieving the element from the DOM and assigning a function literal to the attribute for the event handler.
                    document.getElementById("test1").onclick = function(event) {

                        alert("hello!");

                    };
Since this DIY box has an id of ^test1^, you should now be able to click it and see the result.
Or you can create the function (either through function declaration or using a function literal) first, and then assign it to the event handler.
                    var clickHandler = function clickHandler (event) {

                        alert("goodbye! ");

                    }

document.getElementById("test2").onclick = clickHandler;
Now you should be able to click this box for a message.
Another option that some programmers prefer is to use the ^addEventListener^ method which takes two parameters. The first is the event name (without the "on" -- so use "click" instead of "onclick") and the second is the handler function.
                    function clickHandler (event) {

                        alert("goodbye! ");

                    }

document.getElementById("test3")
                    .addEventListener("click",clickHandler);
Of course you can also add a handler using a function literal. Try this:
                    document.getElementById("test3")

                        .addEventListener("click", function(event) {

                            alert("hello!");

                        });
If you execute both code snippets above, then when you click this box you should get two popups, not one. This illustrates one crucial difference between assigning to ^onclick^ and using ^addEventListener^. The latter allows you to add many event handlers of the same type to the same object.
event Object and the this KeywordNote that the functions above all contain an ^event^ parameter. Any event handler is always passed a special event object that represents the event that caused this function call. You can use it to access information about the event, such as which element triggered the event (^event.target^), which mouse button was pressed (^event.button^), the location of the mouse on the page (^event.pageX^ and ^event.pageY^), etc.
                    document.getElementById("test4").onclick = function(event) {

                        alert(event.pageX+","+event.pageY);

                    };
Now when you click on this box, you will get to see the exact X and Y location of your click, in pixels relative to top left corner of the page. If you change ^pageX^ and ^pageY^ to ^clientX^ and ^clientY^ you get the location relative to the top left corner of the browser window.
                    document.getElementById("test4").onclick = function(event) {

                        alert(event.target.innerHTML);

                    };
Now clicking this box should get you the ^innerHTML^ of the element you clicked on.
But sometimes ^event.target^ won't get you exactly the element you wanted. in this case, you should use the ^this^ keyword.
                    document.getElementById("test4").onclick = function(event) {

                        alert(this.innerHTML);

                    };
Now clicking the DIY box above this one should get you the ^innerHTML^ of the entire box, no matter where you click on it.
For more information on the Event object, see the w3schools' Dom Events page.
window.onload EventIt is also considered best practice in JavaScript, to write all of your code inside a ^window^ load event handler, like this:
                    window.addEventListener("load", function() {

                        // ALL YOUR CODE GOES HERE

                    });
When you put all your code inside the load event, the browser will wait until the page is ready before executing it. So you can put your code into the ^<head>^ of your document without having to worry about whether the DOM is ready at that point. This is a big advantage.
Another advantage is that now all variables you use (including function names) become local to the anonymous function you assign to the ^load^ event. This is good too because it minimizes potential name conflicts with other JavaScript code or libraries you might be using.
Note that because function declarations are just variable declarations in JavaScript, even other helper functions can be defined inside the ^window^ load event.
Now that you know the truth about functions, we can also talk about how to use timers to create animation effects on a canvas
Animation refers to any picture in which elements of the picture seem to move or change over time. The basic technique in any form of animation is to present a series of animation frames (i.e. pictures) one after another very quickly, with each frame slightly different from the last. For example, an object might move very slightly to the right or grow slightly from frame to frame while the rest of the picture remains unchanged. If this is done quickly enough, the eye will be fooled into seeing smooth motion.
To animate an element using JavaScript, we need three things:
(If you want to animate drawings on a canvas, use a very similar method, but the update function will need to clear and redraw the entire contents of the canvas each time it is called rather than making changes to the CSS.)
We'll start with item 3 from the list above: We need a way to trigger a function repeatedly. JavaScript timers are the answer to that problem.
JavaScript functions are called in response to events (e.g. the user presses the mouse button or the page loads). If you want a function to be called repeatedly, or just once but at some time in the future, you have to schedule a timer event. The ^window^ object in JavaScript contains a ^setTimeout^ function to trigger an event some time in the future, and a ^setInterval^ function to trigger an event repeatedly at set intervals.
To trigger an event repeatedly, you can use the following command:
setInterval(functionName, interval);
In the above, ^functionName^ is the name of the function you want to call when the timer events happen, and ^interval^ is the number of milliseconds between each event.
For example, if you want to call a function named ^tick^ every half a second (500 milliseconds), the command would be:
setInterval(tick, 500);
Note that you must not use ^tick()^ with the brackets. This would call the ^tick^ function immediately. But we don't want to call it now, we want to pass it like a parameter to the ^setInterval^ function so that it can be called later, when the timer event happens.
To call a function just once, but at some time in the future, use the following command to schedule a single timer event:
setTimeout(functionName, interval);
The parameters are the same as ^setInterval^, but the function you specify will only be called once, after ^interval^ milliseconds.
                    function hi() {

                        alert("Hello");

                    }

setTimeout(hi,5000);
Now wait five seconds for your message to appear.
setInterval(hi,5000);
Now you will get a popup every 5 seconds. You can reload the page to make it stop.
Both ^setTimeout^ and ^setInterval^ return an integer id for the timer you have created. If you want to stop a timer, you can do so with the ^clearTimeout^ function. But you have to have saved the id of the timer in a variable:
var timerId = setInterval(myFunction, 1000);
With this variable you can stop the timer at any time:
clearTimeout(timerId);
This will also work for ^setTimeout^.
var timerId = setInterval(hi,5000);
Now you can stop the popups by clearing the timer:
clearTimeout(timerId);
Now add code to the file so that there is a "stop alarm" button that, when pressed, will prevent the alarm message from being displayed (if it hasn't already been displayed).
Recall that we needed three things to get an animation going:
We now have the last part: ^setInterval^ can be used to call a function every few milliseconds. All we need now is some global variables and an ^updateAnimation^ function.
The global variables should keep track of position and other information for the objects that are moving.
The ^updateAnimation^ function should take the following actions:
For the appearnace of smooth motion, the ^setInterval^ function should be used to trigger a call to ^drawFrame^ about 60 times per second. That works out to an interval of 16 milliseconds.
To make a nicer canvas game, you might want to load images from a file and then draw them on the canvas. To make a better overall experience for the user, you also might want to play sounds in response to certain events.
To draw an image, you have to create an
^Image^ object, then load an image file into it and then draw it. Creating the image object and loading the image should be done once and stored in a global variable.
                    var myImage = new Image();

myImage.src = "images/myImageFile.jpg";
Once the image is loaded, you can draw it on the canvas in response to an event.
ctx.drawImage(myImage, x, y);
To play a sound, you have to create an ^Audio^ object, then load an audio file into and then play it. Creating the Audio object and loading the audio file should be done once and stored in a global variable.
var myAudio = new Audio("sounds/myAudioFile.mp3");
Once the audio is loaded, you can play it any time. This is done in two steps.
                    myAudio.load(); // resets the sound so it can be played repeatedly

myAudio.play(); // plays the sound
There is one problem lurking in the above instructions. When your app is on line, the HTML page will load first and the sounds and images will only begin to be downloaded from your site when you create the ^Audio^ and ^Image^ objects. What if you try to draw your images or play your sounds before they have loaded?
To deal with this problem for images, you can set up an ^onload^ event like this:
myImage.onload = myImageReady;
Where ^myImageReady^ is the name of a function that will be called when the image is loaded. You can use it to set a global flag to let the rest of the app know the image is ready
The solution for audio is similar but uses a different event:
myAudio.oncanplaythrough = myAudioReady;
In this case, ^myAudioReady^ will be called when the sound can be played through from beginning to end.
Now you have everything you need to make a simple game in the HTML5 canvas. Here's a list of basic components you can adapt to suit your needs:
The primary job of ^computeFrame^ is to draw the current animation frame. But before it does that, it should update the positions of all the objects based on the relevant variables. It should also check for collisions between objects or between objects and the edges of the screen and make changes as a result (reverse speeds to simulate a bounce, increase the score, mark an alien as "dead", end the game, etc.)
Here are a few extra tips to help you out:
That's it. The rest you will have to work out for yourself. Happy gaming!
Throughout this course, you have been using objects in your programs (e.g. the ^document^ object) but you have not been programming in an object-oriented manner.
Javascript supports many programming paradigms. It supports imperative programming by letting you place JavaScript statements anywhere you want on a page. These statements are executed in the order they are encountered (from top to bottom) when the page is first loaded. It also supports procedural programming by letting you declare functions that can be executed over and over again as necessary. And it supports functional programming through its support for first-class functions.
In this chapter, you will learn some of the ways in which JavaScript also supports object-oriented programming, allowing you to create your own objects with whatever instance variables (fields) or methods you wish.
One caveat before we begin: The JavaScript approach to object-oriented programming is quite different from Java and almost every other language. A full discussion is beyond the scope of this course, but you can read more in Introduction to Object-Oriented JavaScript on the Mozilla Developer Network.
In Java, if you want to create an object, you define a class to use as a blueprint and then create objects using it. In JavaScript there is no such thing as a class, and there are many different ways to create a new object. We'll look at two simple ways in the next section, but first here are some important reminders about how JavaScript objects work.
As you have already seen, in JavaScript, you can access an object using the dot operator or by using associative array brackets.
For example: ^document.forms.["myForm"]^ is the same as ^document.forms.myForm^, and ^document["getElementById"]("test1")^ is the same as ^document.getElementById("test1")^
This will be true for the objects you create as well.
In Java, the class creates the blueprint for an object and it cannot be modified at run time. You cannot add or remove instance variables or methods after creating an object.
JavaScript objects are more flexible. You can add a field to an existing object simply by assigning something to a new field name. You can also add a new method simply by assigning a function to a new field name.
`Terminology Note:` A JavaScript object is an associative array linking key names to values. Each key name is an instance variable of that object. As you learned in the previous chapter, functions can be used as values as well. When an Object's instance variable contains a function, we call it a method. Otherwise, we call it a field.
document.myVariable = 45;

document.myMethod = function() {alert("hi");}
You have just added a new field and a new method to the ^document^ object. You can access them like this:
                    alert(document.myVariable); // access the new field

document.myMethod();        // call the new method
You can also delete a field from an object using the ^delete^ operator. This operator can be used to remove any variable from the current context.
                    delete(document.myVariable);

delete(document.myMethod);
Now you should not be able to access this field and method any more.
Now you are in a position to understand some of JavaScript’s notorious silent errors.
                    document.getElementById("test10").style.color="blue";

document.getElementById("test10").innerHtml = "hi!";
Note that the first line worked but the second didn't (the text is blue now, but the contents have not changed).
document.getElementById("test10").innerHtml
This is an example of a very common error in JavaScript: The programmer wants to put a message into a DOM Node and she retrieved the Element object correctly using ^getElementById^ but she got the case wrong on the field name. Instead of ^innerHTML^ she typed ^innerHtml^. But rather than throw an error, JavaScript just added a new field to the Element object (called ^innerHtml^) and assigned the string value ^"hi"^ to it.
This is a prime example of how JavaScript makes a tradeoff between flexibility and ease of debugging.
With the preliminaries out of the way, we can talk about object creation. The first way to create an object is to simply create an empty Object and then add fields and methods to it one by one. JavaScript contains a built in constructor function called ^Object^ that lets you do just that.
var person = new Object();
If you examine person (type "person" in the console and open the Object that is returned) you will see that it’s an object with no contents. To add fields, you can do the following:
                    person.firstName = "Joe";

person.lastName = "Smith";

person.fullName = function() {
                    return this.firstName+" "+this.lastName;
                    }
A literal is a value that is hard-coded into a program. Whenever you use a number like ^-4^ or ^5.43^, a quoted sring like ^"hello"^, a Boolean value like ^true^, or a bracketed array like ^[23,52,-3]^ in a program, you are using a literal. Like most languages, JavaScript supports Number, String, Boolean, and Array literals.
You already know that unlike many languages, JavaScript supports function literals so it should come as no great shock that, also unlike many languages, JavaScript supports Object literals too.
An Object literal must be enclosed in curly brackets. Inside the curly brackets, you put a comma separated list of keys and values (remember, in JavaScript an Object is just an associative array). The field names must be unquoted and the values can be properly formatted literals (including function and object literals) or they can be previously defined variables.
So this is another way of creating an object in JavaScript.
var x = {name: "Joe", age: 40, male: true};

                    var y = {person: x, numPeople:1};

                    var z = {person1: {name: "Jane", age:31}, person2: {name:"Ruth", age:25}};
Now type ^x^, ^y^, and ^z^ and take a look at the contents of each object. Is it what you expected?
                    var circle = {

                        radius: 10,

getArea: function() {

                            return Math.PI*this.radius*this.radius;

                        }

                    };
Now call the ^circle^ object's ^getArea^ method.
Here is the code for a Circle class in Java (not JavaScript!) along with a main method that creates two circles and prints their information to the screen. Take a moment to review this code and remind yourself what each line is for. The numbers are not part of the code, of course, they are just there so we can talk about the differences between JavaScript and Java.
public class Circle { `1`
public double radius; `3`
}
public Circle(int radius) { `2`
this.radius = radius;
}
public double area() { `4`
return Math.PI * radius * radius;
}
public static void main(String[] args) { `5`
Circle c = new Circle(10);
}
Circle c2 = new Circle(5);
System.out.println("Circle 1 Radius: " + c.radius);
System.out.println("Circle 2 Area: " + c2.area());
Here is some equivalent code in JavaScript, again with numbers to help the comparison to Java.
function Circle(r) { `2`
this.radius = r; `3`
}
this.area = function() { `4`
return Math.PI*this.radius*this.radius;
}
c = new Circle(10); `5`
c2 = new Circle(5);
alert("Circle 1 Radius: "+c.radius);
alert("Circle 2 Area: "+c2.area());
In Java, object creation and inheritance are based on classes (labeled “1” in the examples above). You define a class as a blueprint for an object and then you can create multiple objects of that type.
JavaScript does not use classes to define objects. That is why the JavaScript example above does not have a “1” label on it anywhere.
In Java, constructors (labeled “2” in the examples above) are special methods defined inside a class. Their job is to create an object, execute some initialization code, and then return the object created.
In JavaScript, any function can be used as a constructor. In the above example, the function labeled “2” is being used as a constructor. Notice that the function name is capitalized – this is to indicate its intended use as a constructor, in much the same way that Java programmers capitalize the names of classes.
In Java, instance variables (labeled “3” in the examples above) are declared in the body of the class, outside of any method.
In JavaScript, variables do not have to be declared. If you want to create an instance variable in a constructor function, you use the this keyword to indicate that the variable is a field of the object created when the constructor function is called.
In Java, instance methods (labeled “4” in the examples above) are also declared in the body of the class. These methods can access the instance variables of the object.
In JavaScript, instance methods are actually instance variables that contain a function. (Recall that in JavaScript, functions are values that can be assigned to variables.) Any function declared using the this keyword, like the one labeled “4”, can access the other instance variables of the object using the this keyword.
In Java, you create objects by calling their constructors with the new keyword, and you access their public fields and methods with the dot operator (labeled “5” in the examples above). The variables that “store” objects actually store references to those objects rather than the objects themselves. The statements to create and access objects must be contained within a method of some kind. In the Java example above, I have defined a main method so that the objects will be created at run time.
JavaScript works just like Java for creating and accessing objects. The only difference is that since JavaScript allows imperative programming, you don’t have to put the statements that create and access the objects inside a method, though it is often good practice to do so.
In Java, you can control access to your variables and methods using keywords like private and protected. This allows you to hide some of the details of the internal workings of your class.
In JavaScript, you can also have private variables in an object. You can do this by declaring variables or methods in a constructor function without using the this keyword. These variables and methods are private and can be accessed only within the object.
Here’s an example, from |Circle2.html| in the example pack (see |Circle2.java| for the Java equivalent).
function Circle(r) {
JavaScript has an equivalent to Java’s private and public, but what about the other two access levels, protected and package? These levels concern access by subclasses and classes in the same package. Since JavaScript doesn’t have classes or packages, these two access levels are not necessary.var radius = r; // PRIVATE VARIABLE. ONE PER OBJECT CREATED.
}
this.getRadius = function() { // GETTER METHOD FOR PRIVATE VARIABLE.
return radius;
};
this.area = function() {
return Math.PI*radius*radius;
};
JavaScript does not define objects using classes, which means that inheritance has to work in a very different way.
In Java (and most other object-oriented languages in wide use) you define a class which can inherit fields and methods from its superclasses. JavaScript is much more flexible. You can create objects using a constructor function, and then tweak them to add or remove fields as you wish.
In JavaScript, an object is also associated with a prototype that can be used to create similar objects. Prototypes can be used to implement an inheritance mechanism and the correct use of prototypes when creating objects can lead to a more efficient implementation of your code.
Prototypes are well beyond the scope of this textbook, but it is helpful to know for future reference that you can implement a form of inheritance in JavaScript and that you can make object-oriented implementations more efficient using prototypes. (In Chrome’s JavaScript console, when you examine an object, you will notice its prototype information stored in the ^__proto__^ field.)
At this point, you have all the tools you need to create a fully functioning, client-side web app. Here are some ideas for mini-projects that will give you a lot of great practice. In each case, the instructions are displayed in step-by-step stages so you can do all of the project, or just part of it.
This web app could be used by elementary or secondary school students to explore the probabilities involved in rolling a pair of dice.
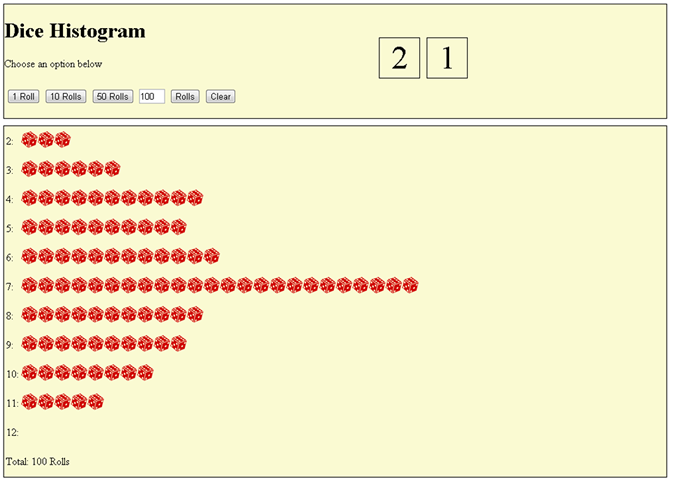
Who doesn’t love Tic Tac Toe? In this project you will develop a web app that could run on a desktop or a mobile phone.
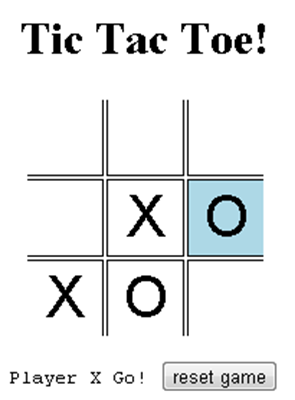
Tip: Mobile phone browsers often default to a really wide screen and zoom out. If they do that, it will make your Tic Tac Toe app hard to use, even though it is sized for a phone. To stop mobile browsers from zooming out, you will need to include the following tag in the ^<head>^ section of your HTML:
<meta name="viewport" content="width=device-width">
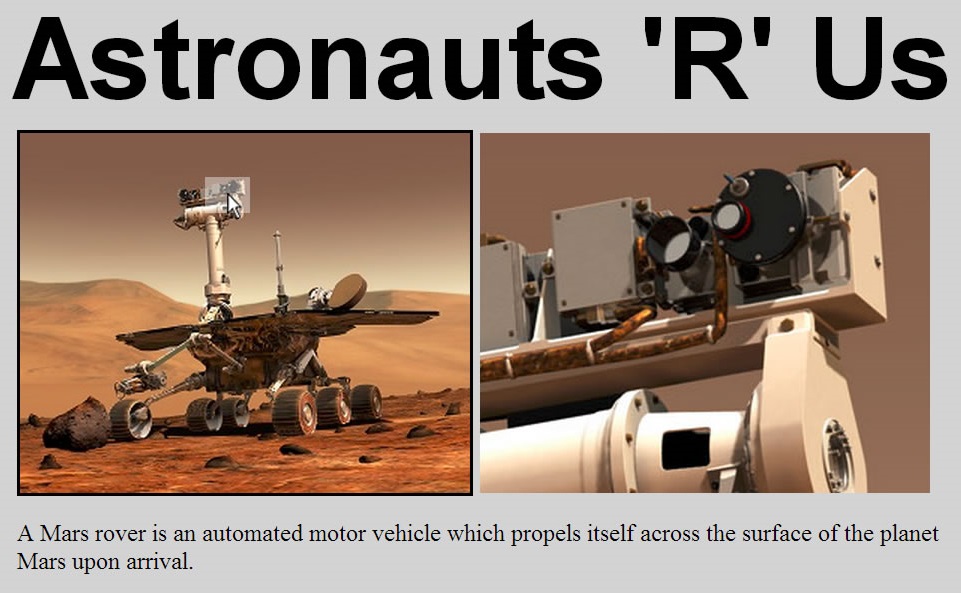
Many shopping sites let you roll over an image to see a magnified version of that image appear beside it. In the web site pictured here, as the user mouses over the main image the detail appears in a window beside it. A small brightened box on the main image follows the cursor to show what is being displayed in the detail image.
Implementing an image magnifier like this is not trivial but the basic trick is to have two images - one that is small to server as the main image and one that is a very large version of the smaller image. This large image can be set as the background of a ^<div>^ or similar element using CSS rules and then changing the position of that background (also specified in CSS properties) can be changed in response to mouse movements over the original image. The ^<div>^ element will act like a "window" on the image, so if you position the image within the window using top and left coordinates which are negative, only the part of the image that would appear under the ^<div>^ element will show through the "window". Getting this right might take some math!
If you can get the movement and display of the image right, there are also lots of other details to worry about including hiding/showing the detail image when the user mouses in and out and deciding what to do when the user approaches the very edge of the original image.
The images shown above are available in the |marsrover.zip| file in the example pack.

Make a simple live action game using the HTML5 Canvas. See the sections on animation, game control, and canvas drawing for ideas on how to make this work.
If you want to program games, it's best to start with recreating something relatively simple, like your own version of pong. Other seemingly simple games like Flappy Bird, Space Invaders or Pac-Man are surprisingly challenging for new programmers, but definitely worth a shot if this sort of programming appeals to you.
Of course there are lots of JavaScript games already on the web with code that you can look at, but many of these games are made with frameworks or use advanced programming techniques. To see a JavaScript game with code that might be a bit more understandable, take a look at Twitty Bird, this author's version of Flappy Bird.
For some sounds and images to help you create a game like Pong, get the file |pong.zip| from the example pack.
You now have almost have all the tools you need to create a true client-side web app. You can define an interface in HTML and CSS, using form elements if required, and then add functionality to it in JavaScript. But these web apps are still dependent on a connection to the server. They are not independent in the way that standalone apps are.
But HTML5 is changing all that. The new web storage system in HTML5 provides an easy way to store data on the client’s machine either temporarily or permanently, and the new app cache allows a user to "reload" a web app they have visited before even when there is no connection to the server. These two new capabilities allow us to create fully functional apps in a web browser that are independent of the server.
Web developers often want their sites to remember users, maintain their settings between page loads, and even keep local copies of the data the user entered for the next time they visit. In the past, this was done by setting HTTP Cookies on the user’s hard drive.
Cookies are small pieces of data (maximum 4KB) that are stored on the client machine by the browser, linked to a particular URL. They are accessible through JavaScript and are automatically sent to the server along with every HTTP request. They are typically used to store a unique identifier for each user or session, and then the bulk of a user’s data is stored on the server side using this unique identifier. This is how sites like Facebook recognize you when you return.
As an alternative to cookies and server-side databases, HTML5 offers two new JavaScript objects: ^localStorage^ for long term data storage and ^sessionStorage^ for temporary data storage. Each domain name gets a single ^localStorage^ object in the browser as well as a ^sessionStorage^ object for each open tab. These objects can store up to 10 MB of data, and this data is stored on the client. It is not automatically sent to the server the way that cookies are. The data in ^sessionStorage^ is automatically deleted when the browser tab is closed, but the data in ^localStorage^ is only ever deleted when a JavaScript program decides to delete it, or when the user clears their browser history. Otherwise, it’s permanent.
                    sessionStorage

localStorage
The ^sessionStorage^ and ^localStorage^ objects work just like any other object, except that they can only store string data. Each item of data is stored under a defined "key", and is accessed the same way as any other object, with square bracket notation or dot notation.
                    localStorage["name"]="Bob";

localStorage.number=22342;
Now type the following to see what you entered.
localStorage
                    localStorage.name;

localStorage["number"];
Notice that the response from the last line is in quotes. This means that the number you entered was converted to a string before being stored.
An aside: In the DIY box above, you might notice that we are adding fields called ^name^ and ^number^ to the ^localStorage^ object on the fly. The fact that variables don’t have to be declared in JavaScript (even though you should always declare them!) extends to object fields as well. You can add a field to any object just by assigning something to it. You can even add new fields to the ^document^ object if you want, as shown below.
document.newField = 12;
Both web storage objects also contain a ^removeItem^ that can be used to remove a single field and a ^clear^ method that can be used to remove all fields at once.
                    localStorage.removeItem("name")

localStorage
Notice that the name field is now gone from the ^localStorage^ object. Now try this:
                    localStorage.clear()

localStorage
Now the ^localStorage^ object should be completely empty.
Suppose you are counting how many times a user visits your site. On the user’s first visit, you will have to create the counter item in ^localStorage^ and set it to 1. On subsequent visits, you should not re-create the counter. Instead, you should access it and increment it. So you need a way to figure out if the user has been here before.
The code below accomplishes this by taking advantage of the fact JavaScript treats the special value ^undefined^ the same as ^false^ in a Boolean expression, and everything else (other than 0 and the empty string) as ^true^. So if the user has not been here before, the else clause will initialize the counter. Otherwise, the counter will be incremented. Notice also the mandatory use of ^parseInt^ here. What would happen if ^parseInt^ was left out?
                    if (localStorage.counter)

                        localStorage.counter = parseInt(localStorage.counter) + 1;

                    else

                        localStorage.counter = 1;
The one drawback to ^localStorage^ is that if your site is on a domain that has multiple users accounts (like ^csunix.mohawkcollege.ca^), somebody else’s web app could access, clear, and overwrite your ^localStorage^ data. There is nothing that can be done to avoid this other than buying your own private domain, but failing that, it’s a good idea to name your data in such a way that is likely to be unique.
For example…
localStorage["App2938475SamScott_vehicle"]="Aveo";
… is less likely to be tampered with than…
localStorage["vehicle"]="Aveo";
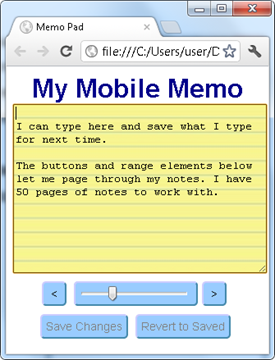
With ^localStorage^ you can create a standalone web app like the mobile memo pad above, but you’re still dependent on the server because each time the user wants to load your app, they have to send an HTTP request and download it again. It would be much better if the app could be stored locally like a native app. And that’s exactly what the HTML5 app cache does.
To use the app cache, you need two things:
We’ll cover these in reverse order.
manifest AttributeThe ^manifest^ attribute is part of the ^<html>^ tag. It specifies the location of a manifest file, like so:
                    ^<html manifest="myManifest.appcache">^

                        … (your page goes here) …

                    ^</html>^
The name of the manifest file doesn’t really matter, but the ^.appcache^ file extension is recommended to ensure that the server marks it with the MIME Type ^"text/cache-manifest"^. The usual rules apply for specifying the file path (same as the rules for the ^href^ or ^src^ attribute). So you could also put the ^.appcache^ file in its own folder as long as you specify the path to it. (In the above example, the manifest file is in the same folder as the HTML file that references it.)
The presence of a manifest attribute in an HTML file will cause the manifest file to be automatically stored locally to be accessed when the user is offline. The contents of the manifest file specify which other files should also be stored locally along with the manifest.
If your web app uses the app cache, it will only be loaded one time. Future visits to the page will load the remote manifest file and check it against the locally stored copy. If they match, none of the cached files will be re-loaded. Local copies will be used instead. So using the app cache also saves bandwidth. But the main point is that if there is no connection or the server does not respond, the app will still load using cached copies of all the files.
Here is the content of a simple cache manifest file:
                    CACHE MANIFEST

#May 29, 2012, 6:34 pm

js/memo.js

css/memo.css

images/116_2.jpg
The first line is required. The line that starts with a ^#^ character is just a comment. The remaining lines specify which files on the site are to be cached (along with the HTML file that loaded this manifest). These are file paths relative to the location of the manifest file.
You can also include a ^NETWORK^ section. This section specifies files that must be loaded fresh from the server every time. And you can also include a ^FALLBACK^ section that specifies a file to be loaded if a page is not accessible. You can read more about these options on the w3Schools HTML5 Application Cache page.
`Important:` Remember that returning users check the manifest first and if it has not changed, they will load local copies of the files only. So when you update your site, it is crucial that you update your manifest file as well, even if all the file names are the same, you must at least change one comment line in the manifest file. If you don’t do this, returning users will not see the updated site.
It's time to get more serious about the HTML DOM. Up until now you have navigated the DOM by using methods like ^getElementById^ or ^querySelectorAll^ to pull out specific elements. You have also made changes to the DOM by accessing a node's ^innerHTML^ property, or by changing attributes and CSS style properties. These techniques can get you a long way, but there will be times when you will want to navigate and manipulate the DOM in more sophisticated ways.
For example, this textbook uses JavaScript to build and insert its own contents section after it is loaded (check the page source and you will not see a table of contents there). This could be done by getting the ^innerHTML^ of the ^<body>^ and then building and inserting a new substring for the contents section, but it would be tricky to reliably find the right place in the string for the insertion, and building such a long HTML string would be tedious and prone to error. It's easier to do it by creating new DOM nodes from scratch and using the DOM ^appendChild^ and ^insertBefore^ methods. You'll learn how to do that in this chapter.
Consider the HTML source below (|domExample.html| from the example pack).
<!DOCTYPE html>
<html>
<head>
</html>
<title>DOM Example</title>
</head>
<meta charset="UTF-8">
<body>
<div id="div1">This div has ID "div1"</div>
</body>
<div>This div has no ID</div>
<div>This div has no ID</div>
Following the analysis we developed in Chapter 2, we should expect the DOM for this document to look like this:
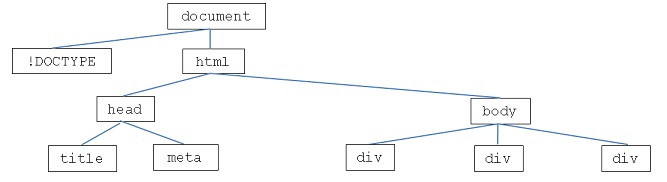
Here's a terminology reminder. In the picture above, there are 10 nodes. The `root node` is ^<document>^. It has two `children` or `child nodes`. Each of the children share the same `parent`. The line from parent to child means that the child is contained within the parent. If there are many children, they are usually shown in order from left to right. Nodes that share a parent are `siblings` (this is the gender-neutral term for "brother" or "sister"). Each of the children of the ^<body>^ node has two siblings. Each Node contains a field for every attribute as well as ^style^ and ^className^ fields.
So far, so good. But we were oversimplifying in Chapter 2. In fact, the browser will create a surprisingly complicated DOM from this source, as shown below.
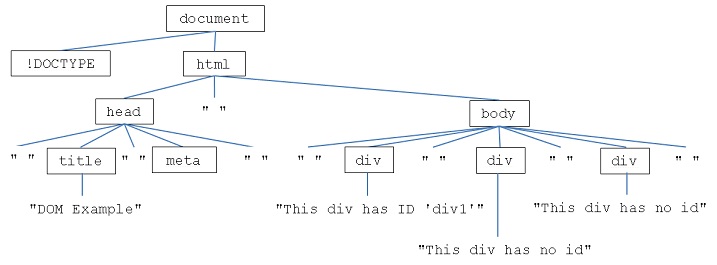
The things in quotation marks are TextNodes. They are a different kind of object from a regular DOM Node. They don't have attributes, style, className or ^innerHTML^. Rather they just have a field named ^data^ that contains a string representing the text. When the browser reads the document, a TextNode will be created for almost every sequence of characters in the document that is not enclosed within ^<^ and ^>^ angle brackets, including every stretch of whitespace characters at the beginning or end of a line. The only stretches of whitespace that don't get turned into TextNodes are those that are not inside or between the ^<head>^ and ^<body>^ tags.
A DOM object in JavaScript is a collection of Node objects that are all linked together into a tree structure with the ^document^ object at the root. In order to effectively manipulate the DOM, you will sometimes have to understand the various ways to navigate this structure, moving from node to node by following the links. The following fields and methods will help you with tree traversal.
                    document.childNodes

document.firstChild

document.lastChild

document.childNodes[0]

document.lastChild.childNodes
Can you explain the result in each case?
There is another way to get hold of a node from the DOM that is sometimes useful. Whenever you register an event handler on an element (such as a click event handler on a button or a mouse over event handler on a table element) you have the option of using an ^event^ parameter.
                    document.getElementById("test5").addEventListener("click", function (event) {

                        alert(event.target.innerHTML);

                    });;
Now click this DIY box to see the result. Depending on where you click, you might get the entire ^innerHTML^ for this DIY box in an ^alert^ window, or you might just get part of it. Try clicking in different places. What do the results tell you about the ^event.target^ object?
One very important piece of information in the ^event^ object is the reference to the DOM node that triggered it, known as the "target". This DOM node object is stored in the ^event.target^ field. In the above example, the user will get an alert with the ^innerHTML^ contents of the node that triggered the event.
In addition to ^innerHTML^, you could also use any other DOM fields or methods with ^event.target^, such as ^event.target.parentNode.innerHTML^, ^event.target.nextSibling.id^, and so on.
This can be extremely useful when you are adding events to a page with lots of similar elements. In the above example, there could be 500 different ^<div>^ elements on the page, and without ^event.target^, you would need to write 500 different event handlers.
For a complete reference on the DOM Event object and all its associated fields and methods, go to the w3Schools event object reference.
There is one really quick way to make modifications to the DOM, and that’s to alter the ^innerHTML^ of a node. You’ve probably already used this field to change the text of an element, but it’s actually much more powerful than that. With the ^innerHTML^ field of a node, you can quickly delete all its child nodes, replace them with new ones nodes, or append child nodes to the end of its existing list of child nodes.
If you assign an empty string to the ^innerHTML^ field of any DOM node, you will delete every node that is a child of that node.
                    document.querySelector("body").innerHTML = "";

document.lastChild.lastChild.innerHTML = "";
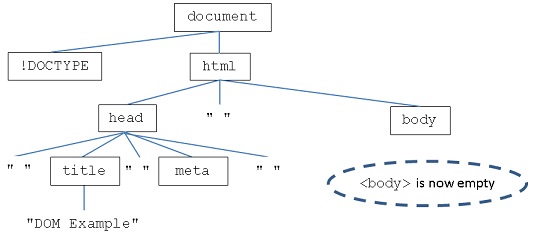
If you put some plain text in the string you assign to ^innerHTML^, you will replace all the children of that node with a single Text Node (or insert a new Text Node if the element had no children).
document.querySelector("body").children[1].innerHTML="Hello";
What does the document tree look like now? Now try the same thing with the ^<body>^ element. Now what does the tree look like?
In the example below the Text Node child of the selected ^<div>^ element will be deleted and replaced with two ^<p>^ nodes, each with their own Text Node contents.
document.getElementById("div1").innerHTML = "^<p>^Para 1^</p>^^<p>^Para 2^</p>^";
What does the tree look like now?
This is true DOM manipulation because you have removed one DOM element and added two new ones in its place.
The new tree looks like this:
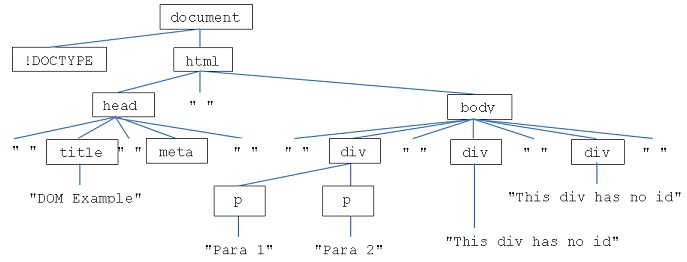
Finally, you can always append new DOM elements by using ^+=^ instead of ^=^.
document.lastChild.lastChild.firstChild.nextSibling.innerHTML += "^<p>^Here is a ^<a href='http://www.google.ca'>^link^</a>^^</p>^";
Manipulating the ^innerHTML^ field is a very powerful technique for changing the HTML DOM and is often easier than other methods. But it can get complicated in some cases, and it is often easier to create the new DOM elements yourself rather than trying to manipulate the innerHTML string.
To create a new DOM Node, you can use the ^document.createElement^ method, giving it the tag name as a string parameter. Here are some examples:
The above code creates two new DOM Nodes and stores them in variables named ^d^ and ^e^ respectively. The ^<div>^ node in ^d^ is empty, but we can make the ^e^ element its child by using the ^appendChild^ method.
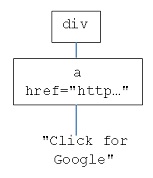
What we now have is a little piece of a DOM, depicted at right. At the moment it is not included in the tree, but we could easily add it as the last child of the body of any document by using appendChild again, like this:
document.body.appendChild(d);
Note the use of the ^body^ field above. This is a special field in the ^document^ object that takes you straight to the ^<body>^ element. There's also a ^head^ field.
                    var d=document.createElement("div");

var e=document.createElement("a");

e.href="http://www.google.ca";

e.innerHTML="Click for Google.";

d.appendChild(e);

document.body.appendChild(d);
Check that the new ^<div>^ is inserted and that the link works. Then use the same code twice to add two identical new elements. What if you wanted to add 100 new identical elements? How could you do it?
It is also possible to insert a new child anywhere within the list of existing child nodes, using the ^insertBefore^ method. The ^insertBefore^ method requires three things: the parent Node, the new Node to insert, and the existing child of the parent you want to insert in front of, like this:
parent.insertBefore(newNode, existingChild);
                    var d=document.createElement("div");

var e=document.createElement("a");

e.href="http://www.google.ca";

e.innerHTML="Click for Google.";

d.appendChild(e);
Now get the second div and the body element and store them as ^parent^ and ^existingChild^.
                    var parent = document.body;

var existingChild = parent.childNodes[3];
Now insert the new node before the second ^<div>^ using ^insertBefore^.
parent.insertBefore(d, existingChild);
Now follow the above example to create and insert a node between the second and third ^<div>^ elements.
Finally, it is also possible to remove particular nodes from the DOM using the ^removeChild^ method. The only tricky thing about ^removeChild^ is that you have to specify a reference to the child to remove, like this:
document.getElementById("body").removeChild(x);
In the above, ^x^ has to be a variable containing the child to remove. For example:
                    x = document.getElementById("body").childNodes[3];

document.getElementById("body").removeChild(x);
One thing you often might want to do is delete an element that the user clicks or mouses over. If you have the event.target and you want to remove it, you can do it like this:
event.target.parentNode.removeChild(event.target);
The text in this chapter mirrors the text in Chapter 12. In this chapter, you learn to use AJAX with raw JavaScript. In Chapter 12, you learn to use AJAX with the jQuery library and you also learn a little bit about how to work with XML data.
Even if you don’t know what AJAX is, you have experienced its effects. When you start typing into the Google search box, it doesn’t take long before you start getting some suggestions about what to search for. When you view your list of friends on Facebook, it starts you with a small list, and when you scroll down, it loads some more for you automatically (often without you even noticing). Both of these are examples of AJAX in action.
Before AJAX, if you wanted to get some more content for the user, you had to get the browser to load and display a whole new page. With AJAX, you can launch an HTTP request from JavaScript. Then when the response data comes back from the server, you can use JavaScript code to incorporate this data into the page without reloading it.
The term AJAX was coined by a web developer named Jesse James Garrett in 2005. AJAX is a term for a new way of thinking about and making use of a collection of already existing technologies. It's not a new language or library or plugin. AJAX stands for Asynchronous JavaScript and XML. Let’s break this phrase down.
`JavaScript:` You already know what this is.
`Asynchronous:` Asynchronous processes are processes that happen outside of the regular flow of the program. In Asynchronous programming, you make some kind of request that will take time to complete, and then continue on with other tasks. In many cases you also specify a callback function to be triggered when the asynchronous task is finished. You saw something a bit like this when you used the ^setTimeout^ function in Chapter 5. This function starts a timer and then allows the app/page to continue running and responding to the user while it waits for the timer to go off, at which point the function you specified gets called. If the timer task was not asynchronous, everything would be at a standstill until the timeout event happened.
`XML:` You may have encountered this before. XML stands for eXtensible Markup Language. It’s a generic markup language for representing structured data. It looks a lot like HTML, but it can be used to represent any kind of data (sports scores, the weather, a shopping list, etc.). XML is one possible format for the data that comes from the server in response to an AJAX request. But you can get your data from the server in any format you want. It can be XML, HTML, JSON (JavaScript Object Notation) or even just plain text. No matter what kind of data you’re getting, most developers would say that if you’re getting it asynchronously by launching a request from a JavaScript program, you’re using AJAX.
Up until now, we have been assuming a web app architecture that looks like this.
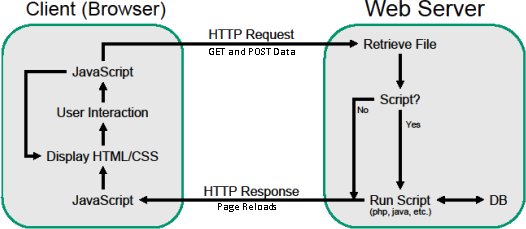
In this architecture, an HTTP request is launched by the user either by typing a URL, clicking a link, or submitting a form. (HTTP Requests are also generated by the browser to automatically to load images, CSS files, JavaScript files and other resources. But I’m ignoring that minor complication in the story I’m telling here.) The request goes to the server where a file is retrieved and/or a script is run to generate the HTTP Response. When the response arrives, the browser interprets the HTML and CSS in the document to display the page, and executes the JavaScript commands in the page. Then it continues to run JavaScript in response to user interactions and other events, refreshing the page view when something changes. It doesn’t go back to the server again unless the user clicks a link, types in a URL, or submits a form.
But with AJAX, the life cycle looks a bit different:
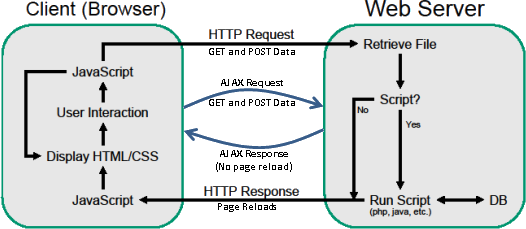
An AJAX request is an HTTP Request just like any other, and can have GET and POST parameters associated with it just like any other. At the server it is treated in exactly the same way as any other HTTP request. The only difference is where it came from: it was launched by a JavaScript function. Since HTTP Requests can take time to complete they are done asynchronously and the programmer register a listener (a.k.a. callback function) to deal with the response when it comes. (What would happen if the requests were not asynchronous?)
The HTTP Response from the server is also the same as any other. The only difference is that when the response arrives at the client, it does not trigger a page reload. Instead, the content of the response is passed to the listener as a parameter.
AJAX queries are launched using the XMLHttpRequest API that is built in to all modern browsers. To launch an AJAX request, you create a new ^XMLHttpRequest^ object and build up your request over several lines of code, adding headers, GET and POST parameters and registering a listener function to be called when the response arrives. Then you launch the request and the page continues operating while the request is in progress.
You can’t do much in AJAX without access to a data source on a server somewhere. There are many excellent sources of data on the web that are free to use in your AJAX programs. For example Yahoo’s YQL (Yahoo Query Language) can be used to retrieve information about geographic locations, weather, music, maps, and a number of other domains. But for now, you need an easier-to-use source of information.
|servers/loremIpsumServer.php?pstart=2&plength=1|
And if you want to test POST parameters with the Lorem Ipsum server, you can use the |servers/loremIpsumPostTest.html| file which uses a ^<form>^ element with its ^method^ attribute set to "post" to send requests to the Lorum Ipsum server.
To send an AJAX GET request, you need to execute a JavaScript statement to perform each of the following steps:
                    `// step 1`

                    var xmlhttp = new XMLHttpRequest();


                    `// step 2`

                    xmlhttp.open("GET", "servers/timeServer.php?request=time", true);


                    `// step 3`

                    xmlhttp.addEventListener("readystatechange", function () {
                    if (xmlhttp.readyState === 4 && xmlhttp.status === 200)
                        alert(xmlhttp.responseText);

                        })


                    `// step 4`

                    xmlhttp.send();
The above should pop up the current time for you in an alert box.In step 2, there are three parameters. The first specifies the type of request ("GET"). The second is the URL which includes the GET parameters. The third is a boolean that is set to ^true^ to make sure this is an asynchronous connection.
In step 3, you are registering a listener for a special event called the ^readystatechange^ event. The listener is the callback function and it makes use of the xmlhttp object created earlier to figure out whether it should take action or not. The ^readystatechange^ event will happen multiple times throughout the life of the HTTP request, and will trigger the listener function each time with a different ^readyState^. But for most purposes only state 4 ("Response Ready") is useful. When state 4 is detected, the next thing to check is the HTTP status that was returned. Status 200 means "OK", 404 means "Page Not Found", etc. Usually, you just check for state 200.
console.log(xmlhttp.readyState+" "+xmlhttp.status);
You will also have to replace the URL with the absolute address of the time server (^https://csunix.mohawkcollege.ca/~scott/javascript/examples/servers/timeServer.php/^)For AJAX requests, the distinction between GET and POST may seem less important since the parameters you send will never be visible in the browser. However, you should still use POST requests in the following cases:
The process for sending POST data is very similar to the process for GET data, but you must set a special header on the request to specify that there are parameters in the body of the message, and you specify the parameters when you call the send method rather than in the URL.
                    var xmlhttp = new XMLHttpRequest();


                    xmlhttp.open(`"POST"`, `"servers/timeServer.php"`, true);


                    `xmlhttp.setRequestHeader("Content-type","application/x-www-form-urlencoded");`


                    xmlhttp.addEventListener("readystatechange", function () {
                    if (xmlhttp.readyState === 4 && xmlhttp.status === 200)
                        alert(xmlhttp.responseText);

                        })


                    xmlhttp.send(`"request=time&timezone=Canada/Pacific"`);
The above should pop up the current time for you in an alert box.The JavaScript code below is from the |ajaxTime2.html| example. Take a moment to read it over and try to understand it.
window.addEventListener("load",
function () {
function launchAjax() {
});
var address="servers/timeServer.php";
}
document.getElementById("ajaxButton").addEventListener("click", launchAjax);
var timezone = document.querySelector("input[name=timezone]").value;
var request = document.querySelector("select[name=type]").value;
var delay = document.querySelector("input[name=delay]").value;
var URL = address + "?timezone=" + timezone + "&request=" + request + "&delay=" + delay;
var xmlhttp = new XMLHttpRequest();
xmlhttp.open("GET", URL, true);
xmlhttp.addEventListener("readystatechange", function () {
if (xmlhttp.readyState === 4 && xmlhttp.status === 200) {
});
document.getElementById("result").innerHTML = xmlhttp.responseText;
}
xmlhttp.send();
The first thing to note is that all the code is inside the ^window^ object's ^ready^ event handler. This is just following the best practices that were introduced in chapter 5.
The second thing to notice is that the ^launchAjax^ function contains calls to the ^XMLHttpRequest^ object that should look very familiar from the previous section. The only difference is that one more parameter is set (^delay^) and the values for each parameter are coming from the form elements. Also, the listener function is placing the data into the ^innerHTML^ of the element with an ^id^ of "result".
The syntax ^$("[attribute=value]")^ is used to select all the elements with a particular attribute value. In this case it’s being used to retrieve named form elements. The programmer could just as easily give them ^id^ attributes and use ^document.getElementById^.
After the definition of ^launchAjax^, the function is added as a ^click^ event handler onto the element with an ^id^ of "ajaxButton".
Now you have two data sources (|servers/loremIpsumServer.php| and |servers/timeServer.php|) and a worked example (|ajaxTime.html|). It’s time to build something of your own.
Because networks can be slow, AJAX requests can sometimes take a few seconds to complete. If things don't happen instantly, it can cause the user to start pressing buttons over and over again, or behaving in other destructive ways which could end up launching more and more AJAX requests. This is a problem you have to think about whenever you use AJAX.
The usual solution to this problem is to control the user somehow while you are waiting for the AJAX request to complete. For example, if the user clicks something to load more content, you could do the following:
This will ensure that only one AJAX request is dealt with at a time.
Another approach might be to have a global variable with a name like ^waitingForAJAX^:
You could also consider placing an animated gif on the page like in the example below.
sendAjax(type, url, parameters, callback_function);
You should write one! Then put it in its own .js file, add it to one of your pages and try it out. Make sure to test both GET and POST.Now you're able to write some powerful, standalone web apps using forms, events and the HTML DOM. But there are easier ways to program web apps than plain JavaScript. This chapter is about jQuery, a public domain JavaScript library that has caught on like wildfire and is changing the way JavaScript code is written. JQuery provides a powerful set of methods for DOM manipulation and event handling that solve many of the cross-browser compatibility issues that arise when using plain JavaScript. To use jQuery effectively, you need to finally understand JavaScript functions a little better, so this chapter will cover that as well.
This chapter will give you the basic tools you need to use jQuery, but I will leave a lot of the details for you to explore yourself. The jQuery API is the definitive source of information about jQuery, and the official Learn jQuery site has some nice tutorials. There are also some useful tutorials in the w3Schools Learn jQuery section.
The jQuery library is publicly available for download, but if you are using NetBeans version 7.3 or later, it is also available automatically as an add-in library for projects of type ^HTML5^.
The jQuery library extends the power of CSS selectors in JavaScript. Recall that a CSS selector is the first component of a CSS rule – the part that specifies which elements the rule applies to. For example, the CSS rule below uses the selector ^"p, #myDiv, span.movie"^ to specify that it applies simultaneously to all elements of type ^<p>^, the unique element with its ^id^ attribute set to ^myDiv^, and any ^<span>^ element with a ^class^ attribute that includes ^movie^.
                    p, #myDiv, span.movie {
                    color:red;
                        width:100%;

                    }
In plain old JavaScript, if you wanted to do make same changes to a diverse collection of elements like this (e.g. suppose you wanted to turn them all green) you would need to write one expression or a set of expressions to get the collection of elements, and then you would need to write a loop to apply the changes to the collection. But now you can use jQuery selectors to do it all in one line, like this:
$("p,#myDiv,span.movie").`dosomething()`;
$("h1,h2,h3").css("color","green");
Note that entering jQuery commands in the console will only work if the current page includes a link to the jQuery library. Since this book makes use of jQuery, it can be used as a jQuery testbed.
In what follows, we will use the jQuery "sandBox" a lot. It's just a page with the jQuery library loaded so that you can try out commands in the JavaScript console. The main page is |jQuerySandbox/index.html| from the example pack. When you explore the |jQuerySandbox| folder and files, you will notice that the jQuery library is included in the ^js^ folder, and that the ^index.html^ file loads the jQuery library using the following line:
^<script src="js/jquery-1.10.0.js">^^</script>^
This line causes all the code in the jQuery library to be included in the sandbox page. If you want to use jQuery in your own pages, you have to do two things:
At the time of writing, version 1.10.0 was the latest version of jQuery, but that might have changed by now. The latest version is always freely available at the jQuery website, where you can also choose the "compressed" or "minimized" version of the library to save bandwidth (it's the same as the regular library, but with whitespace and other unnecessary characters removed, variable names shortened and so on).
jQuery ($) FunctionEverything you will do with the jQuery library will be based on the new ^jQuery^ function. There are two ways to write this function, shown below:
From now on, I will just use ^$^ version.
The `selector` part of the syntax works just like a CSS selector, with a few extensions unique to jQuery selectors. The jQuery function will return an object of type ^jQuery^ that looks and behaves very much like an array of DOM elements.
Before moving on, you may need to review the w3Schools CSS selector reference and you should also take a look at the jQuery API selector reference as well. Note that some CSS selectors are not available in jQuery (e.g. ^:hover^) and some jQuery selectors are new (e.g. ^:not()^). Why would ^:hover^ make sense for CSS but not for jQuery?
$("h1")
The jQuery object that is returned to you should look something like this:
[<h1>Contents</h1>,<h1>1. Getting Started</h1> ... ]
If there are more than 100 elements in the array, things might look a little different. For instance if you type:
$("a")
you'll get something like this instead:
> st.fn.st.init[432]
Which means there were 432 objects returned. If you open the result by clicking on the arrow, you will be able to see the contents, arranged into groups of 100.
The object returned from the $ function can be treated a lot like any an array. For example, this command will change the border style of the checkerboard:
$("#checkerboard")[0].style["borderStyle"] = "dashed";
The above statement is equivalent to the following:
document.getElementById("checkerboard").style["borderStyle"] = "dashed";
Similarly, you could put an X into every even checkerboard square of |jQuerySandbox/index.html| with the following:
                    var squares=$("td.even");

for (var i=0; i<squares.length; i++)

                        squares[i].innerHTML = "X";
`But wait!` Although in some rare cases you might want to do array processing on the jQuery object, in most cases there is a far easier way. Read on...
innerHTML, styles and attributesSo now you've mastered selectors, and you can process the jQuery object as if it were an array. But where jQuery really gets its power is in the chaining of other jQuery methods onto the end of the ^$^ function. Four such methods are ^html^, ^css^, ^val^ and ^attr^. When chained at the end of the ^$^ function using the dot operator, these functions can be used to set the ^innerHTML^, style properties, ^value^ attributes (for form elements) and other attributes of an entire set of selected elements all at once.
                    $("#instructions").html("No more instructions!");

$("td.odd").css("backgroundColor","blue");

$("a").attr("href", "http://www.facebook.com");

$("input:text").val("A new value");
Verify the changes made to the page in each case. Note that the last one makes use of a special jQuery selector ^input:text^ which selects all input elements of type text. There are also selectors for ^:button^, ^:checkbox^ and so on.
                    $("#instructions").html();

$("td.odd").css("backgroundColor");

$("a").attr("href");

$("input:text").val();
Verify that the results make sense in each case.
And method chaining doesn’t stop at just one method! Each chained jQuery method returns a copy of the original jQuery object. This means methods can be chained one after another as many times as you want.
$("#instructions").css("backgroundColor","red").css("color","rgba(255,255,255,0.5)").html("Hello, World!");
There is no limit to how many methods you can chain together in this way.
You can also change the class(es) an element belongs to with the ^addClass^ and ^removeClass^ methods, and you can find out if it belongs to a particular class with the ^hasClass^ method. More information on these methods can be found in the w3schools jQuery section called jQuery CSS Classes.
The jQuery methods mentioned above all have counterparts in ordinary JavaScript (^style^, ^innerHTML^, ^className^, etc.). But in many cases the jQuery versions are more powerful.
document.getElementById("instructions").style["color"]
It returns an empty string because the color property of this element is not explicitly set in the style attribute of the element.
$("#instructions").css("color")
This command searches the hierarchy of CSS styles and returns the correct color ^"rgb(0,0,0)"^ which it retrieves from the default browser style.
The jQuery library also contains methods to make various effects and animations easy. These methods can be chained after the ^$^ function just like the ones discussed in the previous section.
$("#instructions").fadeOut();
The above will fade out the instruction panel, and then remove it by setting its display property to "none".
$("td.odd").fadeOut();
I will leave it to you to explore most of these effects on your own. You can find information on all of them in the jQuery API. Look in the "effects" section. Read the "basics", "fading" and "sliding" sections. Click on each method name for an explanation. You can also go to the w3schools Learn jQuery section for more help.
Note that most of these methods have optional parameters. For example, the page for the ^fadeOut()^ method has the following header:
.fadeOut( [duration] [, complete ] )
The square brackets mean that the ^duration^ and ^complete^ parameters are optional. If you call this function with no parameters, it will use default values. You can also set the duration if you call it with one parameter, or set both duration and "complete" if you call it with two parameters. (I will explain more about the "complete" parameter in the next section).
There is also a generic ^animate()^ method which is explained under "custom" in the "effects" section of the jQuery API. This method needs at least one parameter, specifying a set of CSS properties and values to "move towards". Any of the specified properties that can be animated (usually numeric properties) will be animated.
$("#instructions").animate({left:"200px", width:"100px"})
The parameter on the above instruction is a little odd if you’ve never seen anything like before. The curly brackets indicate that it is actually a specification of a JavaScript object - it's an object literal, something that is unique to languages which, like JavaScript, were derived from ECMAScript. The contents of the curly brackets consist of a list of field names (unquoted) and values (quoted).
So ^{left:"0px", width:"20%"}^ creates a new object with the fields ^left^ and ^width^ set to contain the strings ^"200px"^ and ^"100px"^ respectively. Then this object is passed as a parameter to ^animate()^. You will learn a lot more about creating JavaScript objects in a later chapter.
Up until now, you have probably been adding event handlers to elements by placing JavaScript code into the corresponding HTML attributes, like this:
^<input type="button" onclick="myFunction()">^
This is not considered best practice by most JavaScript programmers for at least three reasons.
It is widely considered best practice to add event handlers in JavaScript after the document has loaded. But to be able to do that, you need to understand how functions work in JavaScript in a little more depth. Once you have this understanding, you will also be able to use the new jQuery ^ready^ method, as well as the callback parameters of the jQuery effects functions.
The truth about JavaScript functions is that they are actually values, just like strings, numbers, Booleans, and objects. Like any other value, functions can be stored in variables, passed as parameters to other functions, and returned from function calls.
The technical term for this is that JavaScript functions are first-class functions.
When you use a function declaration like this:
                    function foo (a, b, c) {
                    alert(a+b+c);
                    }
What you are really doing is creating a variable named foo, and assigning a function value to it.
The following shows the assignment of a function literal to a variable. It is legal JavaScript code, and is basically equivalent to the function declaration above:
                    var foo = function(a, b, c) {
                    alert(a+b+c);
                    };
The above statement creates a variable named ^foo^, and assigns to it an anonymous function with 3 parameters. Note that since this is an assignment statement, we put a semicolon at the end of it.
The main difference between the two notations is that you can only use function declaration in certain contexts, but you can use variable declaration and function literals in any context. Because it is limited and adds nothing to the language, many programmers avoid function declaration altogether and always use the variable declaration / function literal notation.
                    function foo () {alert("hi");} ← foo is a function

foo;

foo();
`Question:` What is the difference between the last two lines above?
alert(foo);

alert(foo());
`Question:` What is the difference between the above two lines?
                    foo = 5; ← foo is now a number

alert(foo);


foo = function() {alert("hi");}; ← foo is a function again

alert(foo);


foo = "hi"; ← foo is now a string

alert (foo);
`Answers:` In the console window, ^foo^ returns the value of the variable. It's a function. But ^foo()^ calls the function so you will see the popup. On the other hand, ^alert(foo)^ will display a popup whose content is the value of the variable ^foo^ (if it's a function, it will show you something to that effect). Finally, ^alert(foo())^ will first call the ^foo^ function, displaying a popup. Then it will create another popup to display the return value of ^foo^. Since there is nothing explicitly returned, it will return the special value ^undefined^.
If you want to add event handlers to an element after it is created, you can do it by getting the element out of the DOM, creating a function, and assigning that function to the attribute for the event handler.
                    document.getElementById("test6").onclick = function(event) {

                        alert("hello!");

                    };
Since this DIY box has an id of ^test6^, you should now be able to click it and see the result.
Or you can create the function (either through function declaration or using a function literal) first, and then assign it to the event handler.
                    var clickHandler = function (event) {

                        alert("goodbye! ");

                    }

document.getElementById("test7").onclick = clickHandler;
Now you should be able to click this box for a message.
Another option that some programmers prefer is to use the ^addEventListener^ method which takes two parameters. The first is the event name (without the "on" -- so use "click" instead of "onclick") and the second is the handler function.
                    function clickHandler (event) {

                        alert("goodbye! ");

                    }

document.getElementById("test8")
                    .addEventListener("click",clickHandler);
Of course you can also add a handler using a function literal. Try this:
                    document.getElementById("test8")

                        .addEventListener("click", function(event) {

                            alert("hello!");

                        });
Now, when you click this box you should get two popups, not one. This illustrates one crucial difference between assigning to ^onclick^ and using ^addEventListener^. The latter allows you to add many event handlers of the same type to the same object.
Note that the functions above all contain an ^event^ parameter. Any event handler is always passed a special event object that represents the event that fired to trigger this function. You can use it to access information about the event, such as which element was the target (^event.target^), which mouse button was pressed (^event.button^), the location of the mouse (^event.clientX^ and ^event.clientY^), etc.
                    document.getElementById("test9").onclick = function(event) {

                        alert(event.pageX+","+event.pageY);

                    };
Now when you click on this box, you will get to see the exact X and Y location of your click, in pixels from the top left corner of the page.
                    document.getElementById("test9").onclick = function(event) {

                        alert(event.target.innerHTML);

                    };
Now clicking this box should get you the full ^innerHTML^.
For more information on the JavaScript Event object, go to w3schools and click on `HTML DOM`, then `HTML DOM Objects`, then DOM Events.
The jQuery library contains its own event management system that extends the regular HTML and JavaScript system, making it more robust, useful and cross-browser compatible. In jQuery, event handlers are added to elements by chaining an event method on the jQuery selector function, like this:
$( `selector` ). `event` ( `handler` );
In the above, "selector" is a normal jQuery selector, "event" is an event name (^load^, ^click^, ^mouseenter^, etc.), and "handler" is a function.
                    var clickHandler = function (event) {

                        alert(event.pageX+","+event.pageY);

                    }

 $("div.DIY").click(clickHandler);
The ^event^ object above is actually a new jQuery event object. It works exactly like the original JavaScript object, but with full cross-browser compatibility.
The correct place to add handlers is either in the ^load^ event of the ^window^ object, or in the new jQuery ^ready^ event of the ^document^ object. Here’s what this would look like.
Using the ^load^ event of the ^window^:
$(window).load( function() {
$( `selector` ). `event` ( `clickHandler `);
});
// more code, function declarations, etc.
Using the ^ready^ event on the ^document^:
$(document).ready( function() {
$( `selector` ). `event` ( `clickHandler `);
});
// more code, function declarations, etc.
(In the above examples, you would replace "selector", "event", and "clickHandler" with appropriate values.)
The difference between the above two options is that the ^window^ ^onload^ event will not fire until all resources (images, etc) required by the page are loaded. But the jQuery ^ready^ event will fire as soon as the DOM is constructed. So unless you want to access images and other external resources that may not be loaded yet, the ^ready^ event is the one you should use.
We should also say something here about ^$(window)^ and ^$(document)^. These calls to the jQuery function do not use a CSS-style selector. Instead they simply provide an object as a parameter. The jQuery function supports this by return a jQuery object with a single object in it - the one that was passed in. So if you have an object and you want to chain jQuery methods on it, you can use the jQuery function and just pass it the object.
$(document.getElementById("test4"));
and
                    var x = document.getElementById("test4");

$(x);
and
$("#test4");
You should get the same result in each case. We will see another very important use of this soon.
Go to the jQuery API events reference for more information on the events supported by jQuery. The most important categories of events are keyboard, mouse, and form events, but you should take a look at the others as well. Note that jQuery provides cross-browser support for some events and event utilities you may not have seen before (e.g. Internet Explorer's ^mouseenter^ event).
It is actually considered best practice in JavaScript, whether you're using jQuery or not, to write `all` of your code inside a ^window^ load event or ^document^ ready event. Even other helper functions should be defined inside these events, like this:
$(document).ready(function() {
or like this:
ALL YOUR CODE GOES HERE
});
$(window).load(function() {
or if you're not using jQuery, like this:
ALL YOUR CODE GOES HERE
});
                    window.onload = function() {

                        ALL YOUR CODE GOES HERE

                    });
When you do this, the browser will wait until the page is ready before executing your code. So you can put your code into the ^<head>^ of your document without having to worry about whether the DOM is ready at that point. This is a big advantage. Another advantage is that now all variables you use (including function names) become local to the anonymous function you assign to the ^ready^ or ^load^ event. This is good too because it minimizes potential name conflicts with other JavaScript or jQuery code or libraries you might be using.
Many jQuery effects have parameters for callback functions. Now that you understand a bit more about functions, you can use these effectively as well. For example, the ^slideDown()^ method has parameters called ^duration^ (in milliseconds) and ^complete^. The ^complete^ parameter should be a function that is to be called after the slide operation has finished. A function used in this way is often referred to as a callback function.
$("div").slideUp();
Now try the following in the JavaScript console to slide them down and turn them red when the slide is finished:
                    $("div").slideDown(1000, function() {

                        $(this).css("backgroundColor","red");

                    });
Notice the use of the ^this^ keyword above. In the example shown, the callback function is going to get called for every single ^div^ element on the page. It's job is to turn each one red. So each time the function runs, it needs to know which object it is being run against - that's what the ^this^ keyword is for - it's a variable that has been automatically loaded with the object the function is being applied to. As I mentioned earlier, you can use the jQuery function to wrap any DOM element inside a jQuery object. So the ^$(this)^ selector lets you chain jQuery methods against whichever element the function is being called against.
$("div").slideDown(1000).css("backgroundColor","red");
`Question:` What went wrong here?
One more thing to notice about |callBackTest.html| is that it is following the best practice of defining all code in a ^$(document).ready^ event handler.
Note: Before reading this section, you should make sure you are familiar with the content in the introduction of Chapter 9 as well as Section 9.1.
The jQuery library includes a number of powerful methods that make traversal and manipulation of the HTML DOM much easier. In this section, I will review several key methods, but you can find the full list in the sections of the jQuery API labelled "Traversal" and "Manipulation".
Before we begin, it should also be noted that you can always use the jQuery ^.html()^ method to remove, insert, and alter any element (see Section 9.4 for a discussion of how to do this in raw JavaScript). But manipulating the DOM in this way can involve some tricky and messy string operations. It is much cleaner, and often much easier, to use the methods discussed in this section.
To traverse the DOM is to move from one node in the DOM tree to another by accessing links to its parent and child nodes. The jQuery Traversal API contains a number of methods to make this easier. The basic methods for navigation are ^.children()^, ^.parent()^, and ^.siblings()^.
                    $("head").children()

                    $("body").children()

                    $("#message").children()

                    $("#message").parent()

                    $("#message").siblings()
The result of the first command above, when expanded, should look something like the image below.
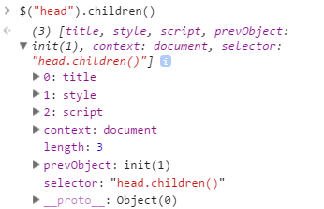
There are also a number of other traversal methods in the jQuery library. Here are a few that you might find useful.
                    $("body").children().last()

                    $("body").children().first().next()

                    $("body").children().last().prev().children()
Removing a specific node can be tricky in raw JavaScript because you have to find its parent first and then call the parent's ^removeChild^ method, correctly specifying which child you want to remove. In contrast, the jQuery Manipulation API contains a simple ^.remove()^ method that does all this for you.
                    $("img").remove()

                    $("#message").children().remove()

                    $("body").remove();
Check the "Elements" view of the page in Chrome. Do the results make sense?.
                    $("div.DIY").click(function(event) {

                        $(this).remove();

                    });
Now try clicking on any DIY box and watch it remove itself.
To insert a node is to first create a node, and then add this new node somewhere in the DOM tree, as a new child of an existing node. The basic jQuery methods for insertion are summarized below.
The simplest way to use these methods is to pass a string parameter containing HTML code for the new node you wish to insert.
                    $("div.DIY").append("<p style='color:red'>append</p>");

                    $("div.DIY").prepend("<p style='color:blue'>prepend</p>");

                    $("div.DIY").after("<p style='color:brown'>after</p>");

                    $("div.DIY").before("<p style='color:green'>before</p>");
Are the results what you expected?
Adding nodes using an HTML string in this way is sometimes convenient, but it can be cumbersome if the nodes you are adding contain a lot of attributes.
Instead, you can create new DOM objects yourself using the jQuery ^$^ function. Once a node has been created in this way you can save it in a variable, modify it with jQuery methods, and then add it (or multiple copies of it) to the DOM when you are ready.
var node = $("<p>").html("Hello, World!").css("color","aqua").attr("title","Quit Hovering!");
Inspect the result by typing ^node^ and expanding the response. Now that you have this node, you can manipulate it until it is ready, then insert it somewhere. Try the code below to add a style property and then insert the new node into this DIY box:
                    node.css("background-color","lightgray")


                    $("#newnodediy").prepend(node);
Try hovering over this new node to see the ^title^ attribute in action.
The text in this chapter mirrors the text in Chapter 10. In this chapter, you learn to use AJAX with the jQuery library and you also learn a little bit about how to work with XML data. In Chapter 10, you learn to use AJAX with raw JavaScript and without XML.
Even if you don’t know what AJAX is, you have experienced its effects. When you start typing into the Google search box, it doesn’t take long before you start getting some suggestions about what to search for. When you view your list of friends on Facebook, it starts you with a small list, and when you scroll to the bottom of that list, it loads some more for you. Both of these are examples of AJAX in action.
Before AJAX, if you wanted to get some more content for the user, you had to get the browser to load and display a whole new page. With AJAX, you can launch an HTTP request from JavaScript. Then when the response data comes back from the server, you can use JavaScript code to incorporate this data into the page without reloading it.
The term AJAX was coined by a web developer named Jesse James Garrett in 2005. At the time, AJAX was a term for a new way of thinking about and making use of a collection of already existing technologies. AJAX stands for Asynchronous JavaScript and XML. Let’s break this phrase down.
`JavaScript:` You already know what this is.
`Asynchronous:` You already know about this too, even if you don’t realize it. Asynchronous processes are processes that happen outside of the regular flow of the program. In Asynchronous programming, you make some kind of request that will take time to complete, and then continue on with other tasks. In many cases you also specify a callback function to be triggered when the asynchronous task is finished. You saw this in the last chapter where I introduced you to jQuery’s animation and effects functions like ^slideUp^, ^fadeIn^, and ^animate^. Because these are asynchronous tasks, the user can still interact with the web page while the animation is happening. If they were not asynchronous, everything would be at a standstill until they finished.
`XML:` You may have encountered this before. XML stands for eXtensible Markup Language. It’s a generic markup language for representing structured data. It looks a lot like HTML, but it can be used to represent any kind of data (sports scores, the weather, a shopping list, etc.). XML is one possible format for the data that comes from the server in response to an AJAX request. But you can get your data from the server in any format you want. It can be XML, HTML, JSON (JavaScript Object Notation) or even just plain text. No matter what kind of data you’re getting, most developers would say that if you’re getting it asynchronously by launching a request from a JavaScript program, you’re using AJAX.
Up until now, we have been assuming a web app architecture that looks like this.
In this architecture, an HTTP request is launched by the user either by typing a URL, clicking a link, or submitting a form. (HTTP Requests are also generated by the browser to automatically to load images, CSS files, JavaScript files and other resources. But I’m ignoring that minor complication in the story I’m telling here.) The request goes to the server where either a file is retrieved and becomes the HTTP Response, or a script is run and the output of the script becomes the HTTP Response. When the response arrives at the browser, it interprets the HTML and CSS in the document to display the page, and executes the JavaScript commands in the page. Then it continues to run JavaScript in response to user interactions and other events, refreshing the page view when something changes. It doesn’t go back to the server again unless the user clicks a link, types in a URL, or submits a form.
But with AJAX, the life cycle looks a bit different:
An AJAX request is an HTTP Request just like any other, and can have GET and POST parameters associated with it just like any other. At the server it is treated in exactly the same way as any other HTTP request. The only difference is where it came from: it was launched by a JavaScript function. Since HTTP Requests can take time to complete they are done asynchronously and you register a callback function to deal with the response when it comes. (What would happen if this was not asynchronous?)
The HTTP Response from the server is also the same as any other. The only difference is that when the response arrives at the client, it will not trigger a page reload. Instead it will be passed to the callback function you registered.
AJAX queries are launched using the XMLHttpRequest object that is built in to all modern browsers. To launch an AJAX request from scratch, you would create a new XMLHttpRequest object and build it up over several lines of code, adding headers, GET and POST parameters, registering a callback function, etc. It is not that hard to do (for more information, go to the w3schools Learn AJAX section) but it’s messy and easy to make mistakes. As with so many other tasks in JavaScript, jQuery will make your life a lot easier here.
You can’t do much in AJAX without access to a data source on a server somewhere. There are many excellent sources of data on the web that are free to use in your AJAX programs. For example Yahoo’s YQL (Yahoo Query Language) can be used to retrieve information about geographic locations, weather, music, maps, and a number of other domains. But for now, you need an easier-to-use source of information.
|servers/loremIpsumServer.php?pstart=2&plength=1|
And if you want to test POST parameters with the Lorem Ipsum server, you can use the |servers/loremIpsumPostTest.html| file which uses a ^<form>^ element with its ^method^ attribute set to "post" to send requests to the Lorum Ipsum server.
If take the first option and you are using NetBeans, you should be able to use a project of type PHP and set up an option so that NetBeans automatically copies files to the WampServer or XAmpp server running on your machine. If you get that right, you can "run" your PHP projects from NetBeans.
Take a moment to set yourself up before moving on.
The jQuery API lists a number of shortcut and helper functions to make your life easier using AJAX. We will focus on just two here, both listed under the heading "shorthand methods" in the AJAX portion of the API. The two methods are ^jQuery.get()^ and ^jQuery.post()^. The name ^jQuery^ is just another way to access the familiar ^$^ object, so we will use ^$.get()^ and ^$.post()^ in the examples below.
As you might have guessed, these functions are for sending GET and POST requests, respectively. Other than their name, the syntax of these two functions is identical. There are three parameters of note:
                    $.get(

                        "servers/timeServer.php",

{

                            timezone: "Canada/Eastern",

request: "time"

                        },

function(data) {

                            alert(data);

                        }

                    );
The above should pop up the current time for you in an alert box.
There are three parameters in the ^$.get()^ method above. The first is the URL. Note that it is specified relative to whereever the browser is now. The second is a map of GET parameters (this object has a syntax exactly like the map you had to pass to the ^animate()^ method in the previous chapter). Together, the URL and data parameters above are equivalent to the following:
… /servers/timeServer.php?timeZone=Canada/Eastern&request=time
The final parameter is the callback function. This function could take up to 3 parameters, but we will only be using the first (^data^), which contains the text of the response from the server.
The JavaScript code below is from the |ajaxTime.html| example. Take a moment to read it over and try to understand it.
$(document).ready( function() {
var launchAjax = function() {
});
$.get(
$("#ajaxButton").click(launchAjax);
"servers/timeServer.php",
)};
{
timezone: $("[name=timezone]").val(),
},
request: $("[name=type]").val(),
delay: $("[name=delay]").val(),
function(data, textStatus, jqXHR) {
$("#result").html(data);
};
The first thing to note is that all the code is inside the ^document^ object's ^ready^ event handler. This is just following the best practices that were introduced in the last chapter.
The second thing to notice is that the ^launchAjax^ function contains a call to ^$.get()^ that should look very familiar from the previous section. The only difference is that one more parameter is set (^delay^) and the values for each parameter are coming from the form elements. Also, the callback function is placing the data into the ^innerHTML^ of the element with an ^id^ of "result".
The syntax ^$("[attribute=value]")^ is used to select all the elements with a particular attribute value. In this case it’s being used to retrieve named form elements. The programmer could just as easily give them ^id^ attributes and use ^$("#id")^.
After the definition of ^ajaxFunction^, the function is added as a ^click^ event handler onto the element with an ^id^ of "ajaxButton". This could have been done in HTML, but again, it is considered best practice to do it here.
Now you have two data sources (|servers/loremIpsumServer.php| and |servers/timeServer.php|) and a worked example (|ajaxTime.html|). It’s time to build something of your own.
Because networks can be slow, AJAX requests can sometimes take a few seconds to complete. If things don't happen instantly, it can cause the user to start pressing buttons over and over again, or behaving in other destructive ways which could end up launching more and more AJAX requests. This is a problem you have to think about whenever you use AJAX.
The usual solution to this problem is to control the user somehow while you are waiting for the AJAX request to complete. For example, if the user clicks something to load more content, you could do the following:
This will ensure that only one AJAX request is dealt with at a time.
Another approach might be to have a global variable with a name like ^waitingForAJAX^:
The only problem with the above strategy is that sometimes AJAX requests do not complete (the server is down, there’s a typo in the URL, etc.). In this case, the callback function is never called, and the user could end up waiting forever.
In the AJAX section of the jQuery API, there’s a subsection on Global AJAX Event Handlers. This section describes the ^$(document).ajaxError()^ method. You can use this function to register an error event handler attached to any element or elements. Then if an AJAX error happens, this function will be called and you can re-enable the appropriate buttons or reset the appropriate variables.
You can use AJAX requests to retrieve any type of document that is accessible through HTTP requests on the World Wide Web. These documents do not have to be in XML format despite the "X" in the name AJAX (indeed so far we have only been using plain text files). But most of the time, information does come with structure attached, and XML is by far the most common way of representing that structure.
Here's some data from a book store, adapted from w3Schools.
                    cooking, Everyday Italian, Giada De Laurentiis, 2005, 30.00

web, xQuery Kick Start, James McGovern, Per Bothner, Kurt Cagle, James Linn, Vaidyanathan Nagarajan, 2003, 49.99

web, paperback, Learning XML, Erik T. Ray, 2003, 39.95

programming, JavaScript for Mohawk Students, Sam Scott, 2013, 0.00
This information is a little hard to read, but if you look carefully you might notice it appears to be data for 4 different books, along with book type, title, authors, year of publication, and price.
Here is the same information in XML format:
<bookstore>
<book category="cooking">
</bookstore>
<title lang="en">Everyday Italian</title>
</book>
<author>Giada De Laurentiis</author>
<year>2005</year>
<price>30.00</price>
<book category="web">
<title lang="en">XQuery Kick Start</title>
</book>
<author>James McGovern</author>
<author>Per Bothner</author>
<author>Kurt Cagle</author>
<author>James Linn</author>
<author>Vaidyanathan Nagarajan</author>
<year>2003</year>
<price>49.99</price>
<book category="web" cover="paperback">
<title lang="en">Learning XML</title>
</book>
<author>Erik T. Ray</author>
<year>2003</year>
<price>39.95</price>
<book category="programming">
<title lang="en">JavaScript for Mohawk Students</title>
</book>
<author>Sam Scott</author>
<year>2013</year>
<price>0.00</price>
Notice how much easier it is to see the structure of this document. HTML-like tags are being used to provide it with structure and make it easier to work with, both for machines and for humans. When everybody uses XML, data can be more easily transported and shared between applications.
Here's a list of similarities between XML and HTML:
And here's a list of differences:
When you go into the Chrome developer console and look at the "elements" view of the document, you are looking at the HTML Document Object Model (DOM). When you work with the JavaScript ^document^ object, and use it to make changes to an HTML page, you are accessing and modifying the HTML DOM.
XML documents can also be represented and accessed using a DOM. The act of converting a text representation of an XML file into a DOM object is called parsing. Chrome contains a special JavaScript object called ^DOMParser^ that does this very job.
                    var xmldoc = "<note type='reminder'><to>Sam</to><from>Anne</from> <text>Don't forget the groceries.</text></note>";

var parser = new DOMParser();

var dom = parser.parseFromString(xmldoc,"text/xml");
The first command simply defines a string variable with XML data in it. The second command creates a new ^DOMParser^ object. The third command parses the variable and creates a document object.
The XML DOM tree is constructed just like the HTML DOM trees you learned about in Chapters 4 and 10. The simple ^<note>^ example above has the following structure:
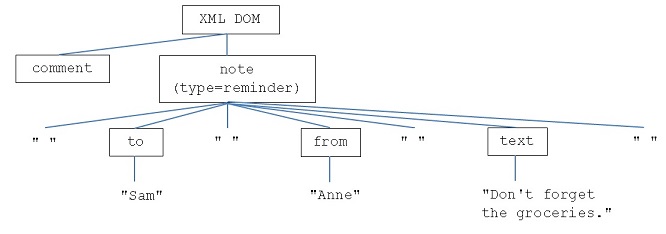
Here's a terminology reminder. In the picture above, there are 13 Nodes (8 are DOM Nodes and 5 are TextNodes, including whitespace TextNodes - see Chapter 11). The `root node` is ^<note>^. It has three `children` or `child nodes`. Each of the children share the same `parent`. The line from parent to child means that the child is contained within the parent. If there are many children, they are shown in order from left to right. Nodes that share a parent are `siblings` (this is the gender-neutral term for "brother" or "sister"). Each of the children of ^<note>^ has two siblings.
A DOM object in JavaScript is a collection of Node objects that are all linked together in a tree structure. This is true whether the DOM is for an XML document or an HTML document, so most of what you learned about the HTML DOM in Chapters 4, 7, and 10 applies to the XML DOM as well. Instead of ^document^ at the root, you find a DOM object, and every piece of text also appears as a special child node called a Text Node.
As with the HTML DOM, you can navigate the structure by moving up and down along the links with the following fields and methods.
                    dom.childNodes

dom.firstChild

dom.lastChild

dom.childNodes[0]

dom.firstChild.getAttribute("type")
Can you explain the result in each case?
Just like with the ^document^ object, you can also use tag names and ^id^ attributes (if the XML document has them) to find particular elements inside the DOM. The methods are the same as for the HTML DOM: ^getElementById^, ^getElementsByTagNames^, ^querySelector^ and ^querySelectorAll^.
These methods can be used to search within any node, not just the root node. For example if you wanted the author name of the third book in the bookstore example, you could load the XML DOM into a variable called ^dom^ and do the following:
dom.getElementsByTagName("book")[2].getElementsByTagName("author")[0]
The first ^getElementsByTagName^ retrieves a list of all the ^<book>^ elements. The ^[2]^ retrieves the third node from the resulting array of ^<book>^ elements. Then the next ^getElementsByTagName^ looks just inside that node for ^<author>^ elements, and the ^[0]^ retrieves the first one from the array of found nodes.
When you use jQuery, loading an XML document is almost as easy as loading plain text. You can use the same commands (^$.get^ and ^$.post^) with exactly the same parameters as before. The only difference is that the data parameter of the callback function will be converted by jQuery into an XML document using the ^DOMParser^.
`Troubleshooting Tip`
If you are trying to put some data from an XML file (say a province name) into your output and you keep getting things that look like this:
[object Text]
This means that you are trying to print out a Text node. But you don’t want to print the whole node, just the data it contains. To do this you need to access the data field.
For example, this won’t work:
textOutput += dom.getElementsByTagName("name").firstChild
Do this instead:
textOutput += dom.getElementsByTagName("name").firstChild.data
This stuff can be tricky! Make sure you give yourself lots of time. Perhaps even working with a partner would be a good idea.
$.get("XMLData/note.xml",function(data) {x = data;});
Note that there are no parameters required, so we are only using the URL and the callback function parameters. The callback function simply stores the data parameter into a global variable ^x^. XML is a big topic and there is lots more that can be said. For those who want to go further, W3Schools has good tutorials on all things XML. On the front page of w3schools, scroll down to XML tutorials and read through the Learn XML and Learn XML DOM tutorials in particular for more information.